

This tutorial will showcase how you can be very productive with an on-demand tiling system that does not require you to make a hard choice at login. Window Shuffler allows you to use tiling only when you want, on the monitor or virtual desktop you want, without requiring you to log off your regular DE and switch to a tiling environment.
Since I started using it, I have a hard time using any other desktop environment that does not bring the features of Window Shuffler.
Window Shuffler is developed by Jacob Vlijm of Ubuntu Budgie. It is installed by default on Ubuntu Budgie. Various users reported that it works well on other GTK desktop environments, such as Ubuntu MATE. I believe it is also available on the AUR for arch users… btw.
Having said that, there are some integrations that are done very well on Ubuntu Budgie, so for anyone willing to give it a try, I recommend to spin up a live ISO of the latest Ubuntu Budgie. By doing so, you will be able to have a taste of the full experience of Window Shuffler.
Tiling
When opening Window Shuffler Control app, we can see that Basic quarter & half tiling is already enabled by default, and key bindings are displayed.
What we want to do, is enable our custom grid. Let’s go ahead and turn on “Resizing & moving windows in a custom grid”.
Regarding grid size, this is entirely dependant on your screen size, resolution, and preferences. In this virtual machine I am using for this tutorial, a 3 columns x 2 rows is more than enough. On my main desktop PC, I use a single 34″ ultra wide monitor, with a resolution of 3440×1440. In order to optimize the space there I use a 6 columns x 4 rows. Feel free to experiment with what works for you and your workflow.
Let’s have a look at what the options below mean and do:
- Resize opposite window: When you are moving a window around, shuffler will automatically resize a window that touches the window we are moving, so that it will swap size with the one you are moving.
- Swap windows: When you are moving a tiled window around, if it touches another window, instead of overlapping, the other window will swap places with the one you are moving.
- Show notification on incorrect window size: This option, when enabled, will pop up a warning when a window is resized by shuffler to its minimum size.
- Enable GUI grid: When this option is enabled, you can bring up a GUI grid with CTRL+ALT+s . From this grid, you can click on a window, then on a position on your grid to move it.
Personally, I usually like to keep only “Swap windows” enabled, but feel free to experiment and choose what works best for you.
Keyboard shortcuts
Keyboard shortcuts are very well thought and don’t conflict with other shortcuts on Ubuntu Budgie. Please note that those are not hard coded, more on this at the end of the article. Many key shortcuts refer to the Super key. This is what others might call the Meta key, or the Windows key. I will give you a very basic explanation on how you can quickly start using Shuffler’s shortcuts. Once you get familiar with the basics below, you can learn other keyboard shortcuts and get even faster.
I reached out to Jacob Vlijm and he told me he is currently working on a way to make it easier to change Window Shuffler shortcuts using GUI tools. I believe default shortcuts are great, but I also know that tiling fans have their preferences, and being able to tweak shortcuts is going to be a big, welcome change.
- Tile all open windows: Hit Control+Super+A and all windows on current workspace will be automatically resized and tiled.
- Moving windows: In order to move windows around, Hold Super+Alt, and hit one of the directional arrows on your keyboard: ← ↑ → ↓
- Resizing windows: In order to resize windows, hold Control+Super, and hit one of the directional arrows on your keyboard: ← ↑ → ↓
That’s it, pretty intuitive, isn’t it? Let’s get some practice with the video below.
Layouts
Layouts can be described as quick dial buttons you can use on demand, to get specific applications started and/or moved to monitors, virtual workspaces, and positions on your grid.
If you like Layouts as much as I do, you will want to start using them right away. Lucky for us, it is super easy to get started. First of all, move to Layouts tab in Window Shuffler Control, enable Layouts, and the click Setup now. This will open our list of Layouts. To continue, click on Add new.
Here, we will select our New layout name. In this case, I am going to call this: Front Page Linux Workflow, then click create.
Once done, I am going to start the applications and use tiling shortcuts to move and size them the way I want. I want to use for this workflow. In order to write articles for Front Page Linux I need is file manager, a terminal, Firefox, and a text editor.
Then, I am going to open again my Layout editor, and click on Add task. First task will be called Nemo, because Nemo is the default file browser of Ubuntu Budgie. First thing to do, is click on Command* and type “nemo”. I will then click on the WM class group* and then use my mouse to click on the File Manager window. Shuffler will capture WM class group automatically. Window name is optional, but can be used to further customize layouts.
Then, we need to tell Shuffler where to open or move this window.
- Grid size; columns & rows: This is automatically selected from the grid size I chose on main Shuffler window. I could, in theory, have a different grid on each Layout. It does not have to match my main grid. But let’s keep simple for now, and leave the default.
- Target window position, x/y: This one is where we want this window to be opened/moved in our grid, so relative to the max number on our grid size. In this case, I want my file manager to open on the top left of the screen. Which means position x = 0 and position y = 0.
- Window cell span, hor/vert: This is where we tell shuffler how big this window should be. In my case, I want the file manager to be as small as possible so I will leave both set to 1.
- Target monitor: This is useful for multi monitor setups. In my virtual machine, I only have one monitor, so I will leave this as Not set.
- Target workspace: I use virtual workspaces a lot. In this case I want my Front Page Linux workflow on Workspace 2.
- Try to move existing window: I like this one, so if for some reason I already opened those windows or I moved them around by mistake, I can re-apply the layout and it will fix the problem.
Next, we are going to do the same for our other windows on this Layout. A quick recap of all the tasks in this Layout:
Nemo is going to be on the top, left corner, so Target Window position is x = 0, y =0, and Window cell span, is hor = 1 ver = 1. Target workspace 2 and try to move existing window on
Tilix is going to be below nemo, so Target Window position is x = 0, y =1, and Window cell span, is also hor = 1 ver = 1. Target workspace 2 and try to move existing window on.
Firefox is going to be on nemo’s right, so Target Window position is x = 1, y = 0, and Window cell span, is hor = 2 ver = 1. Target workspace 2 and try to move existing window on.
Gedit is going to be below Firefox, so Target Window position is x = 1, y =1, and Window cell span, is also hor = 2 ver = 1. Target workspace 2 and try to move existing window on.
It’s actually easier done than said. Let’s go ahead and have a look at the image gallery below. All settings are intuitive and well described.

Window Shuffler Layouts list 
Window Shuffler Layout’s task list 
Window Shuffler Layout: Nemo setup 
Window Shuffler Layout: Tilix setup 
Window Shuffler Layout: gedit setup 
Window Shuffler Layout: Firefox setup
That should do. Let’s give it a try, and see how it works.
Now, let’s consider Layouts like on-demand, multiple applications advanced launchers with window positioning rules. We can have as many as we want, and use when we need a specific set of applications bundled together in a specific way.
If, however, we want to open many Layouts at the same time, and some of those use same applications, we need to be aware of some potential problems. First of all, in this case, Window name comes in very handy. For example, a text editor that opens a specific file, or a terminal in a specific location, we can match it to Shuffler Layouts and we can then avoid conflicts. If this is not possible or too much of a hassle to handle, then at the very least we would need to disable the option “Move existing window” from our tasks. This should resolve most conflicts between concurrent Layouts of same applications.
Window rules
Window rules might seem similar to Layouts, but they are actually very different. KDE Plasma users might be familiar with Window rules, as it is a native feature in KDE Plasma DE.
A window rule is configured in Shuffler in a very similar way as a Task within a Layout, as we previously saw. However, where Layouts are launched on-demand, Window rules are always active.
If for example, you always want to have Firefox to open on your second monitor, or in a virtual workspace, and always maximize, you can setup a Window rule here. Once the rule is configured, there will be nothing left to do manually, and your Firefox will be forced to open according to your Window rule configuration. I will use this example to show you how to configure Window rules.
First thing we need to do, is click on the box next to WM class group*, then click on Firefox window. Correct VM class group is automatically entered. Next we will select Window position & size. This is very similar to Layouts. In this case we want to configure as follows:
- Grid size; columns & rows: Same as above, let’s keep simple for now, and leave the default.
- Target window position, x/y: This one is where we want this window to be opened/moved in our grid, so relative to the max number on our grid size. In this case, I want Firefox to open on the top left of the screen: position x = 0 and position y = 0.
- Window cell span, hor/vert: This is where we tell shuffler how big this window should be. As I just said, I want Firefox to be mas size: Window cell span hor = 3 and ver = 2.
- Target monitor: This is useful for multi monitor setups. In my virtual machine, I only have one monitor, so I will leave this as Not set.
- Target workspace: I use virtual workspaces a lot. In this case I want Firefox on Workspace 3.

Window Shuffler: Rules list 
Window Shuffler: Firefox rule setup
Time to check if this works. I am going to close my Window Shuffler Control, make sure I am on workspace 1, and launch Firefox from my plank dock.
Applet
Window Shuffler applet is a nice, optional feature introduced by Jacob Vlijm with Ubuntu Budgie 21.10. It allows us to add an applet to Budgie panel, which controls Shuffler tiling. This is very useful especially for users that are new to tiling, or those that have not learned the shortcuts, or that like tiling windows but are not keyboard fanatics.
In order to get started, we first have to open Budgie Desktop Settings, Panels, Top Panel, and click the + Icon next to Add applet. Scroll to the bottom, and add Window Shuffler. I am going to leave it in the default position, next to the clock in the middle of my top panel. Feel free to move it around as needed. We can now close Budgie Desktop Settings.
Next step is to open our Window Shuffler Control. We can now do this from the gear icon in our new Applet.
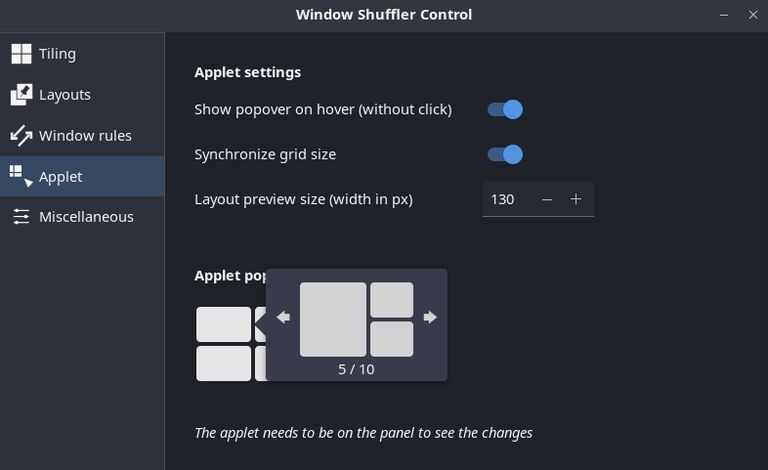
Applet settings: Show popover on hover
Show popover on hover (without click) is self explanatory. If you want the applet to popover as you position your cursor over it, leave this enabled. If you want this to popover only when you click on it, disable.
Applet settings: Synchronize grid size
This is a hidden pearl, it shows how much thought the developer put into this applet.
Leaving This option enabled, means that tiling windows using the applet, will always change our grid size to match the layout we choose from the applet. This gives us a very nice and consistent experience if we have a hybrid approach and we use both the applet, and shortcuts.
Disabling this option, means that we still can apply applet layouts on demand and even move windows within a layout from the applet freely. However, layouts applied via the applet, will not override our grid size. This allows for great flexibility. For example, I can freely move windows according to the default grid that I chose, on workspace 1 and 2. And I can apply a completely different layout via the applet, on workspace 3.
Applet settings: Applet popover content
This one is a lot of fun. We can see 4 boxes, and each one represents one of the four layouts you can choose from the applet on our Budgie panel. Clicking on one of the boxes, allows us to pick which layout we want for that position.This allows for great flexibility and customization.
Easier done that said, let’s have a look at what we can do.
After we are done configuring our applet behavior, we can use Shuffler without worrying too much about learning shortcuts. Using the applet is very intuitive. There are a few icons on the bottom of our applet, that are really useful.
The first one, is used to swap window positions. In order to use it, select an application on the destop, then open Shuffler applet, click on swap, and that’s it. Another great feature of it in my opinion is the icon that allows us to toggle between tiling windows one by one, or applying the layout to all open windows. I really like this flexibility. Now that we are up to speed and ready to go, it’s about time to take this Window Shuffler applet for a test drive.
Window Shuffler settings backup and restore
I really don’t like losing all my custom options, grid setup, and I want to be able to move it across installs or computers. Lucky for us, it is really easy to do. For the time being , we need to use the terminal to do that. I am going to create and use a new folder “~/shufflerbackup“ in my Home to store all settings. I can then very easily backup this folder and move it to other computers.
Backup all Window Shuffler settings
mkdir ~/shufflerbackup
dconf dump /org/ubuntubudgie/plugins/budgie/shuffler/ > ~/shufflerbackup/shuffler-dconf-backup
dconf dump /org/ubuntubudgie/plugins/budgie/shuffler/ > ~/shufflerbackup/shufflerapplet-dconf-backup
rsync -vah ~/.config/budgie-extras/shuffler ~/shufflerbackup/
Restore all Window Shuffler settings
mkdir ~/shufflerbackup
dconf load /org/ubuntubudgie/plugins/budgie/shuffler/ < ~/shufflerbackup/shuffler-dconf-backup
dconf load /org/ubuntubudgie/plugins/budgie/shuffler/ < ~/shufflerbackup/shufflerapplet-dconf-backup
rsync -vah --delete ~/shufflerbackup/shuffler/ ~/.config/budgie-extras/
Conclusion
I am certainly a fan of Ubuntu Budgie, and Window Shuffler is one of those things I can no longer do without. Tiling on demand on my beloved Desktop Environment boost my productivity without having me make a hard choice on login, between tiling or non-tiling. This is really hard to beat.
I want to thank Jacob Vlijm for his great vision and passion. Jacob is always working on Window Shuffler, bringing new features and improving the user experience. I sincerely hope that writing about this amazing tool brings some attention to it. It would be very nice to see Window Shuffler working at its full potential on other Ubuntu Flavours and even other Linux distributions.
If you found this exciting and you want to help out, there are many ways to get involved. Those that want to contribute to Ubuntu Budgie can reach out on Discourse, take part in the discussion, and even request to join the team.
Those that want to help Window Shuffler or integrate it to their distribution can find Window Shuffler on github: . Feature requests and pull requests are welcome, as long as they stay in line with Window Shuffler core value of staying a flexible tool to improve productivity without locking users into rigid tiling.
I hope you enjoyed this tutorial. If you did, you can check my other tutorials and articles on Front Page Linux
