
In this tutorial I will take you on a quick tour in the world of Jack audio. I will show you that Jack does not have to be hard at all, and can be used by everyone. At the end of this tutorial, you will have a rock solid Linux distribution, an elegant, modern desktop environment, and the power of Jack audio.
This is made possible by the amazing Ubuntu Studio team. They have done incredible work to ensure that all the tech that powers Ubuntu Studio, can also be installed in Ubuntu or any of the Ubuntu Flavours using the Ubuntu Studio Installer. In this tutorial, I will be using Ubuntu Budgie as the base OS, and add Ubuntu Studio components on top of it. You will see how well it integrates, and how easy it is to manage JACK audio on your preferred Ubuntu Flavour.
Note on Kubuntu: Most of the Ubuntu Studio GUI tools are based on QT, and Ubuntu Studio is going to switch their base DE to Plasma very soon. Kubuntu is a solid choice for those that like Plasma DE and want Jack audio.
Target Audience for this Tutorial
I made this tutorial for all Linux users. I will take you step by step into the configuration, which is done completely from GUI tools. If you are using Ubuntu Budgie you can follow the steps as they are. Other Ubuntu Flavours might need minor adjustments, for example when I configure plank, which might not be enabled by default on your flavour.
- PROs
- Easy to install and manage Jack audio server.
- Low latency audio.
- Low latency kernel, CPU governor, and other tweaks.
- Carla patch bay, rack, easy plugins and effects management.
- CONs
- Not as easy as Pulse Effects.
- Only available on Ubuntu and its flavours/derivatives.
Step 1: OS Installation
- Install the OS. In this tutorial, I am using Ubuntu Budgie 20.04 LTS.
- After Install, Open “Software” then “Software and Updates”, “Other Software” tab, and enable Canonical Partners. Alternatively, you can enable partner repos by editing /etc/apt/sources/sources.list and uncommenting Canonical Partners repo.
- Apply the new setting, reload the cache, and exit the application.
- Open “Software Updater”, then install all updates and reboot. Alternatively, you can run the following commands in your terminal:
sudo apt-get update && sudo apt-get dist-upgrade -y Step 2: Ubuntu Studio Installer
Reference documentation: Ubuntu Studio Installer
- Open “Software”, search for “Ubuntu Studio Installer”, select and install.
- During installation, select “Enable realtime process priority”, and click Next.
- Open application menu, search for “Ubuntu Studio” and open “Ubuntu Studio Installer”.
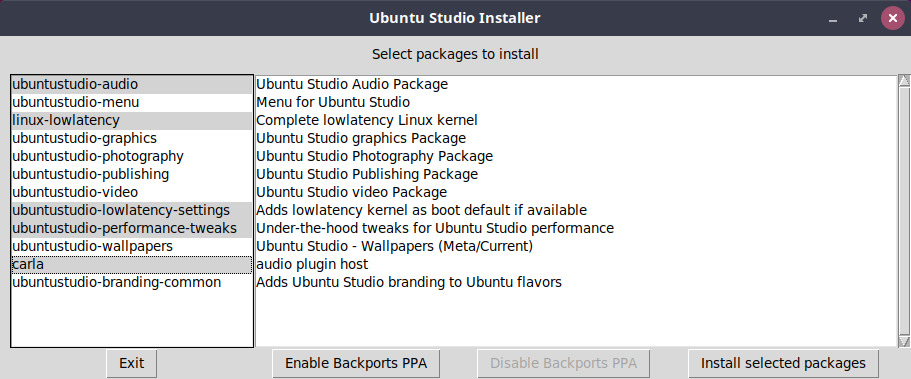
- Click on “Enable Backports PPA” and confirm.
- Select the following applications from the left menu:
- ubuntustudio-audio
- linux-lowlatency
- ubuntustudio-lowlatency-settings
- ubuntustudio-performance-tweaks
- carla
- Select “Install selected packages”
- Wait for installation to complete

- Reboot
- Make sure you are running low latency kernel:
- Open a terminal and run:
uname -a - Something like this should be displayed:
Linux yourhostname version.of.kernel-lowlatency
- Open a terminal and run:
Step 3 – Ubuntu Studio Controls
Open application menu, search for “Ubuntu Studio” and open “Ubuntu Studio Controls”. Right click on the “Ubuntu Studio Controls” Icon on the Plank dock, and select “Keep in Dock”.
Open “Ubuntu Studio Controls” -> “System Tweaks”.
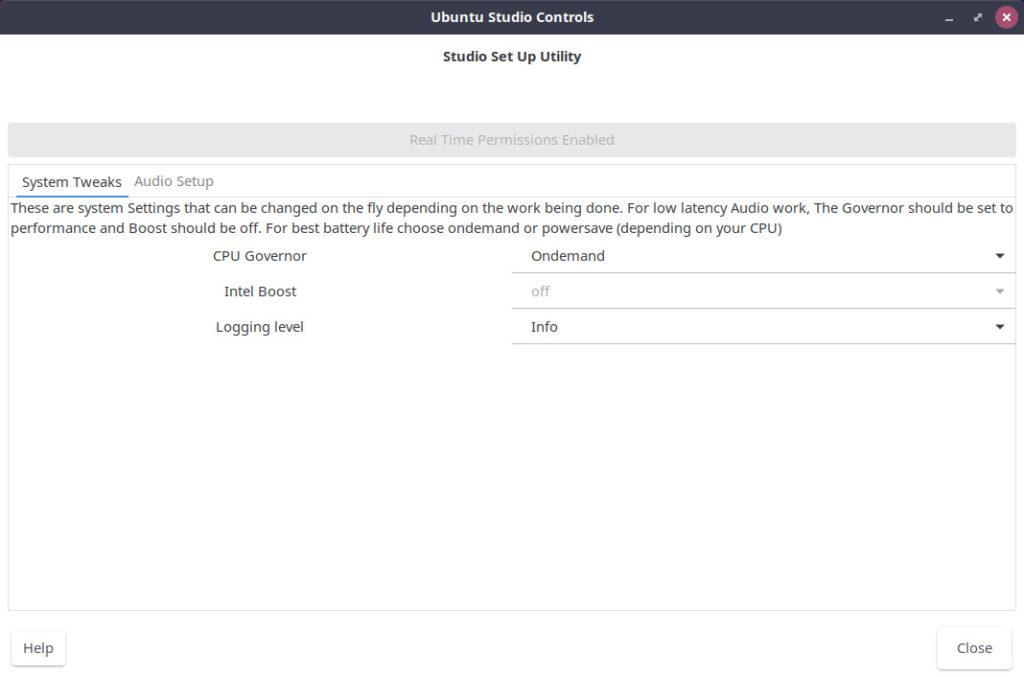
- In the “System Tweaks”, check the following:
- Make sure the top item displays as “Real Time Permissions Enabled”.
- CPU Governor: As general rule, “Performance” gives the best results. However, I leave it as default because I prefer to control governor as needed, using the Budgie applet “CPU frequency”.
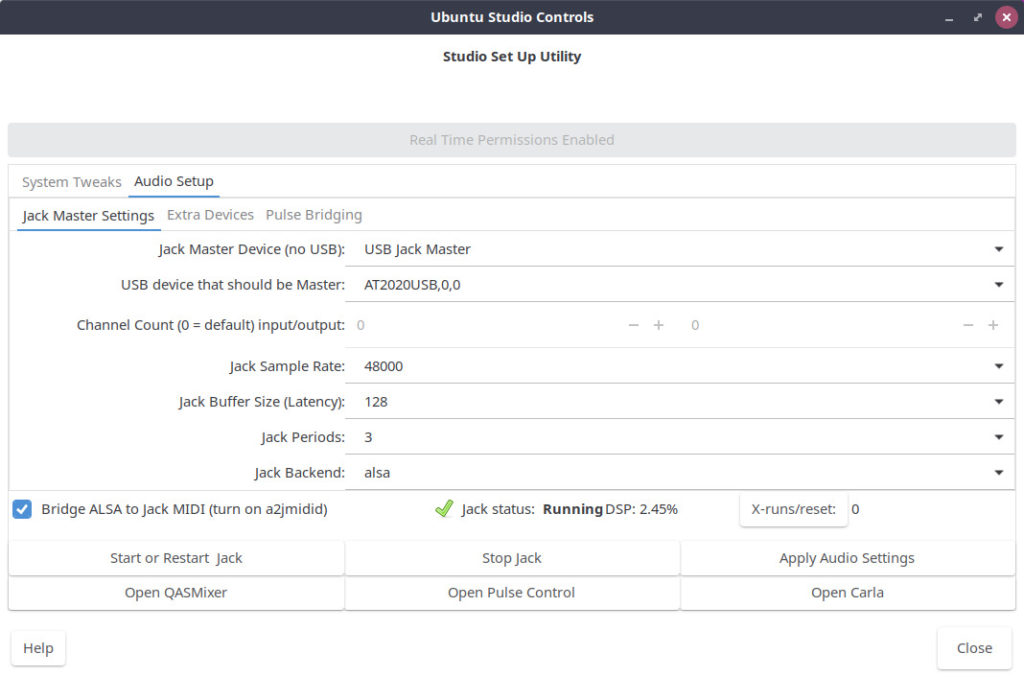
- Open “Ubuntu Studio Controls” -> “System Audio Setup”.
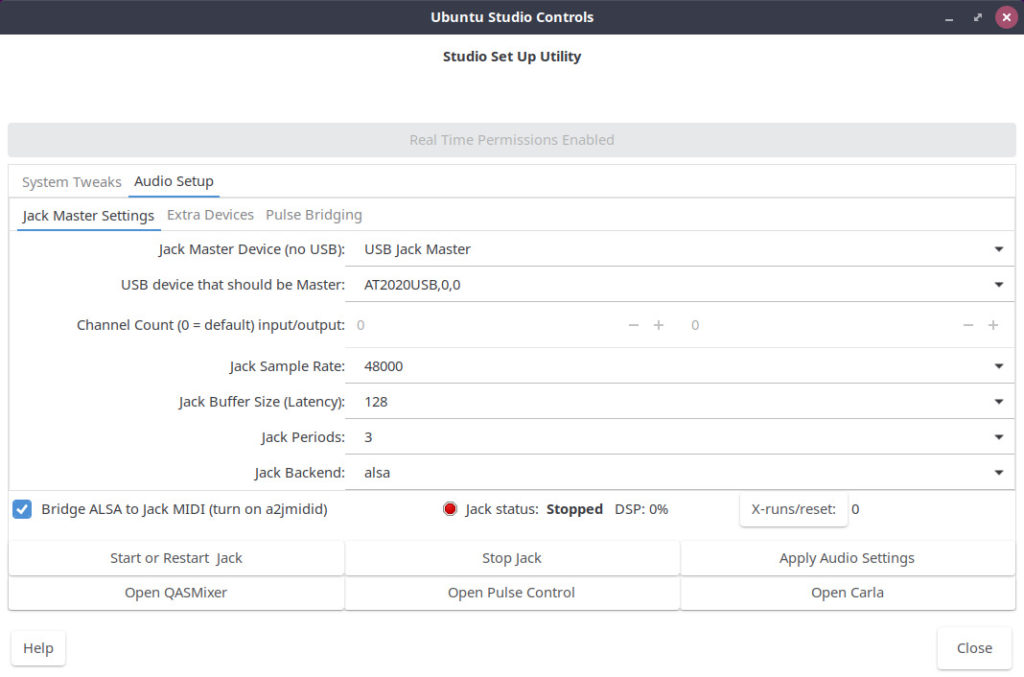
- In the “Audio Setup” tab, check the following:
- Select your “Jack Master Device (no USB). If you need to use an USB interface, select “USB Jack Master”, or directly select the USB interface in the menu “USB device that should be Master”.
- Jack Sample Rate: This is hardware specific. Check your interface manual. 48000 or 44100 are typical settings that work with many devices.
- Jack Buffer Size (Latency): This is hardware specific. Check your interface manual. Start with 128.
- Jack Periods: Also hardware specific. 3 is a good setting for USB interfaces.
- Jack Backend: alsa
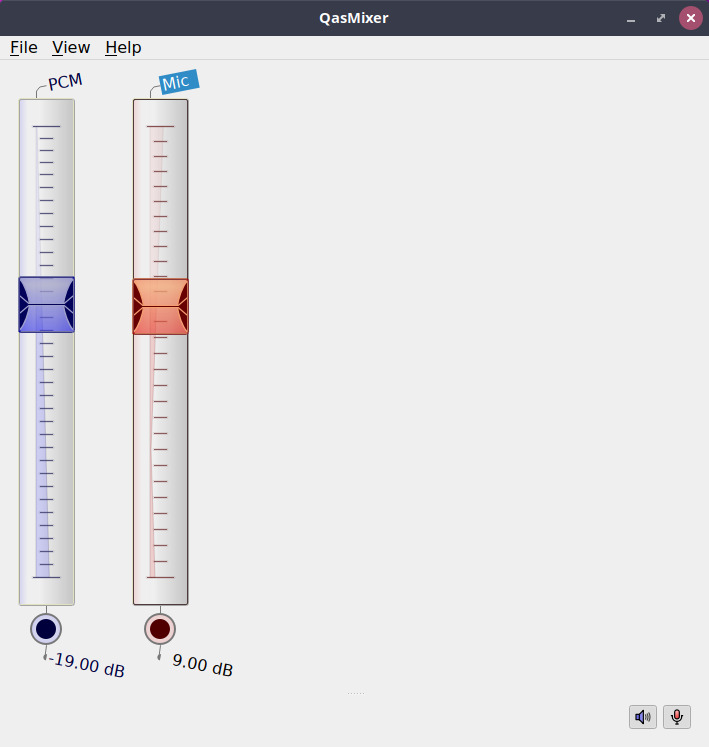
- Click on “Open QASMixer”.
- In the QASMixer settings, make sure both input and output devices are visible, and their volumes are at acceptable levels.
- Close QASMixer when done
At this point, basic setup will be completed. Connect your headset to your output audio interface (In my case, using an Audio Technica 2020USB+ Microphone).
Click on “Start or Restart Jack”. Make sure X-runs/reset numbers are zero. If you see the number increase, it is better to tweak Jack Master Settings.
In the picture below, you can see Jack status is green, running, with low DSP, X-Runs/reset are at zero. All looks good to go.
Next up, let’s test our audio. Go ahead and open Open OBS Studio
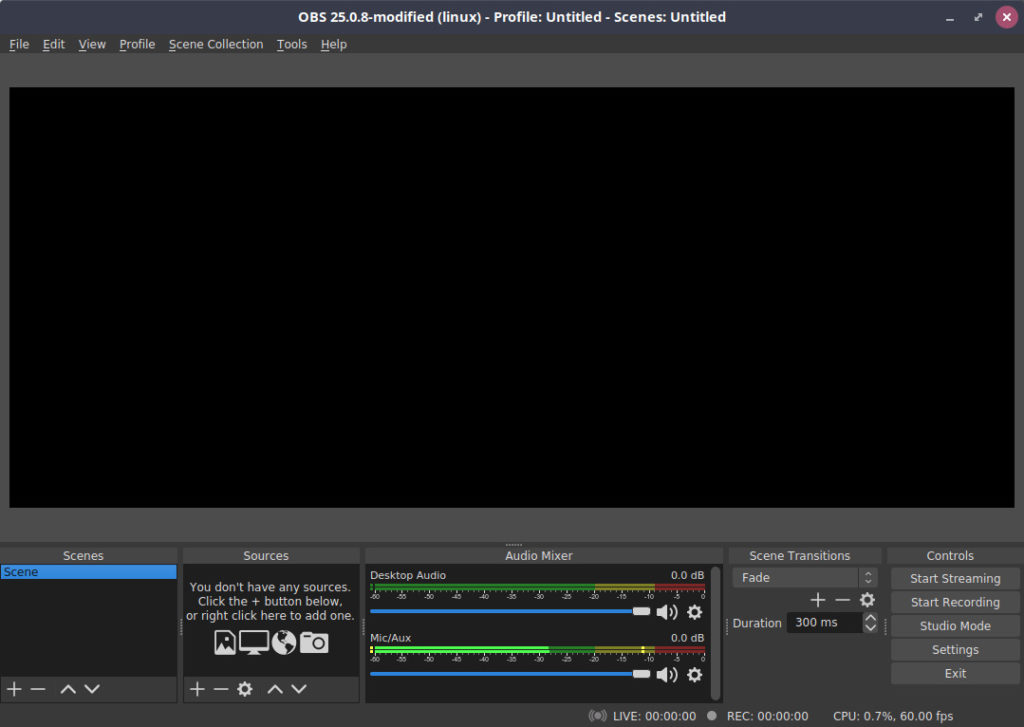
In OBS Studio, configure microphone in monitoring mode. This means you can hear your own voice in your headset. It is very important to do this to test settings.
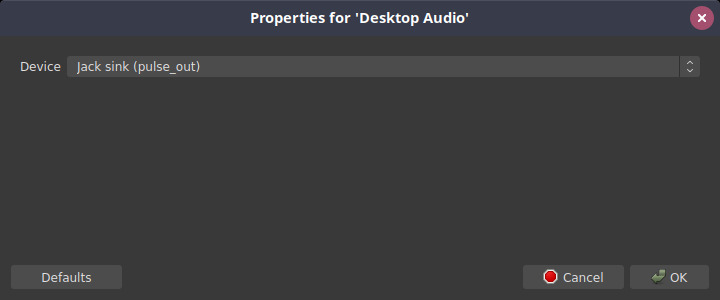
In the Audio Mixer panel, Select the gear icon on Desktop Audio and select properties. Select “Jack sink (pulse_out)”, and confirm by clicking “OK”.
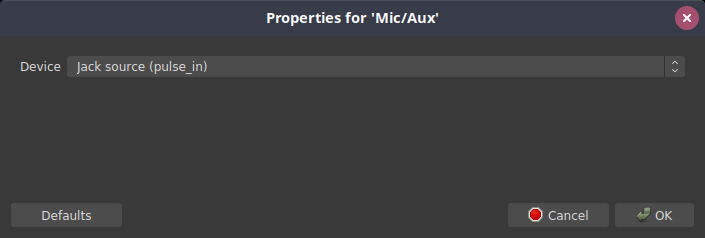
Select the gear icon on Mic/Aux and select properties. Select “Jack source (pulse_in)”, and click “OK”.
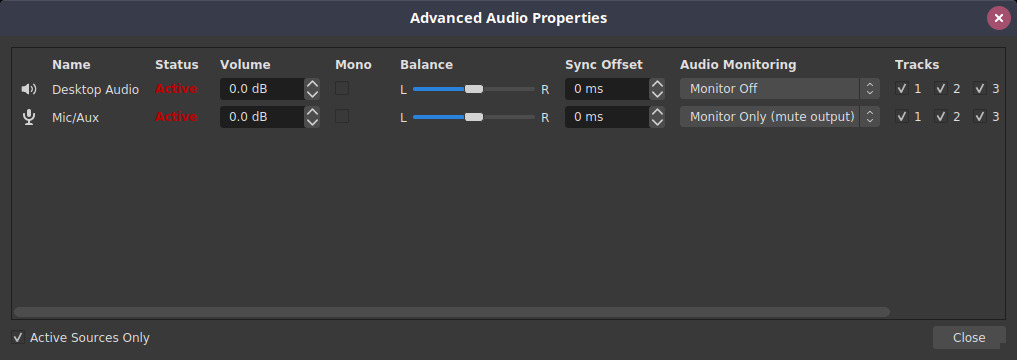
Select the gear icon on Mic/Aux and select “Advanced Audio Properties”. In the Mic/Aux Audio Monitoring, select “Monitor Only”, and click “Close”
That’s it. Your OBS is now monitoring your microphone. Speak in the microphone. Being Jack a low latency audio server, there should be no delay between your voice and the sound coming from your headset.
My Audio Technica 2020USB+ sound output has a slider I can move to balance direct monitoring (at the hardware level) or audio coming from the system. Sliding back and forth, optimal setting should have no difference in delay. This concludes Jack basic setup via “Ubuntu Studio Controls”.
NOTE: “Keep Ubuntu Studio Controls” in Plank. In case of sound issues, it is very fast to open it, check Jack status, and eventually restart Jack.
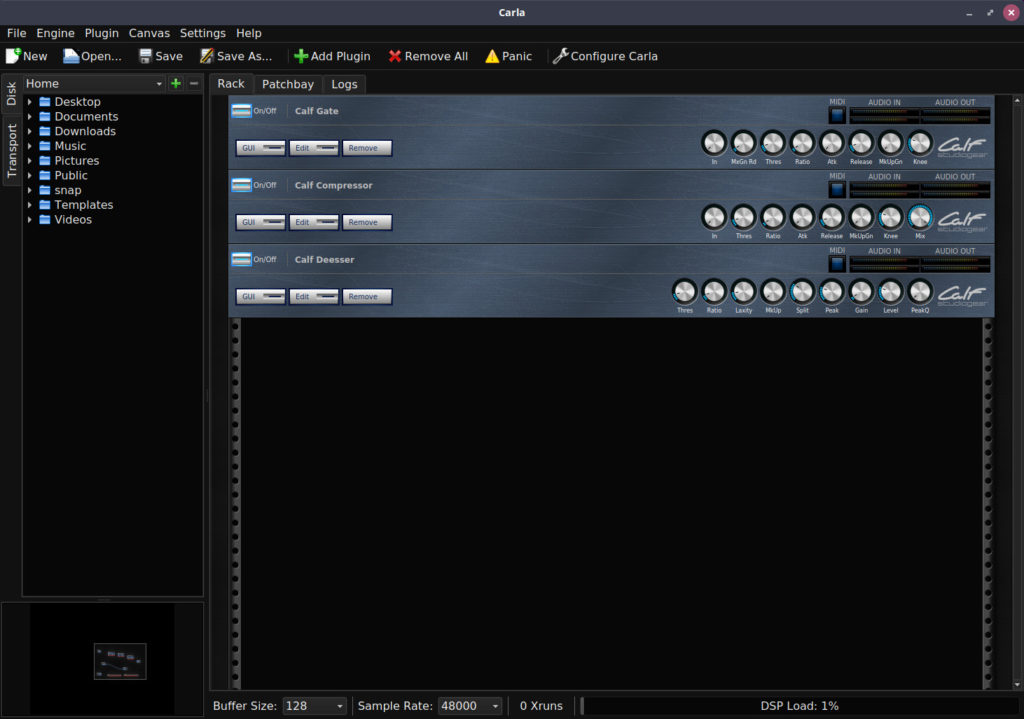
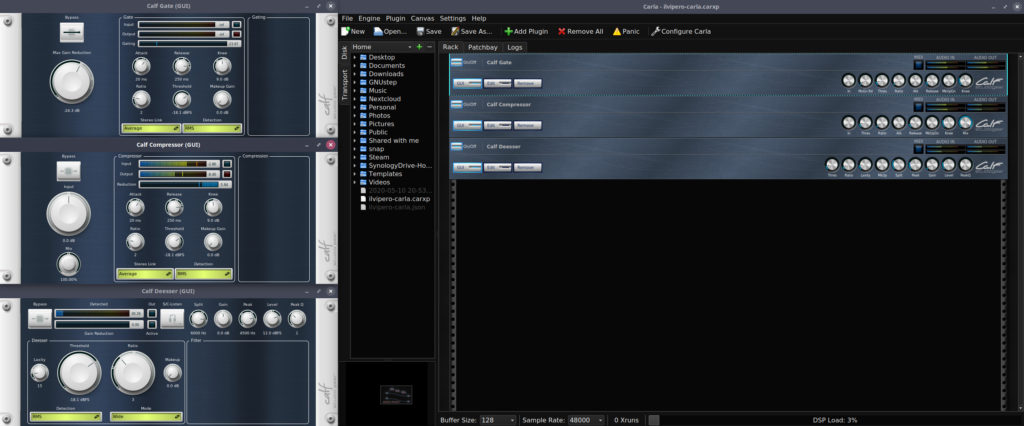
Step 4: Carla Patchbay and Rack
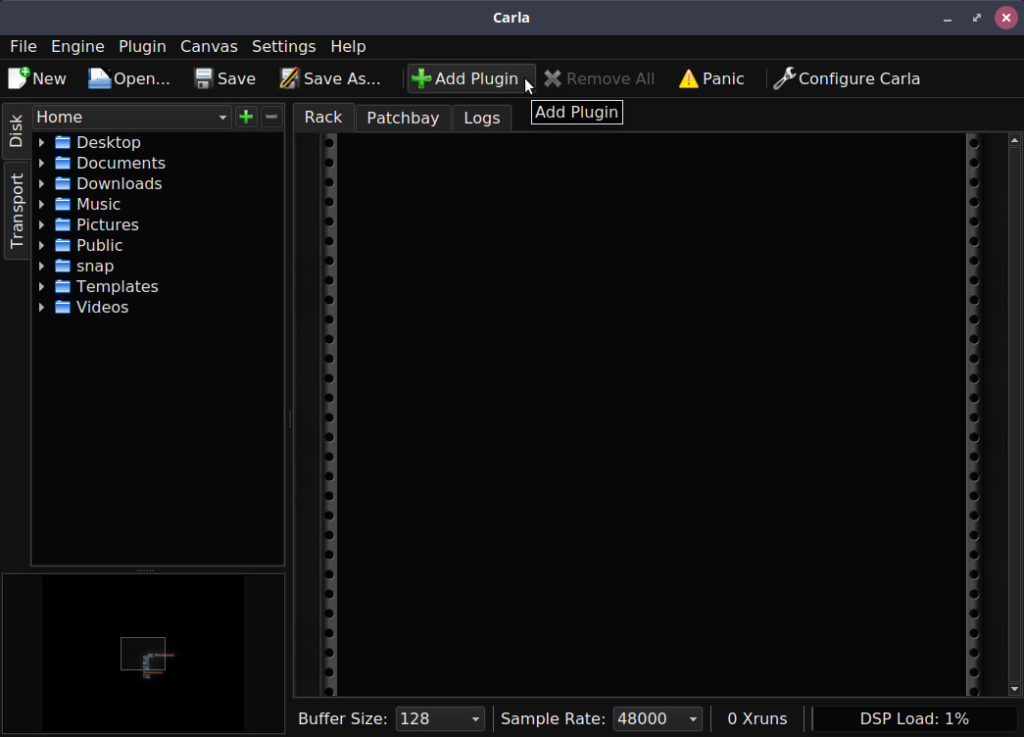
You’ll need to make sure your OBS Studio is open and in microphone monitoring mode, if you’re not quite sure how to get in that mode then see the instructions above. Open “Ubuntu Studio Controls”, and click “Open Carla”. Right click on the “Carla” Icon on the Plank dock, and select “Keep in Dock”. Click on “Add Plugin”.
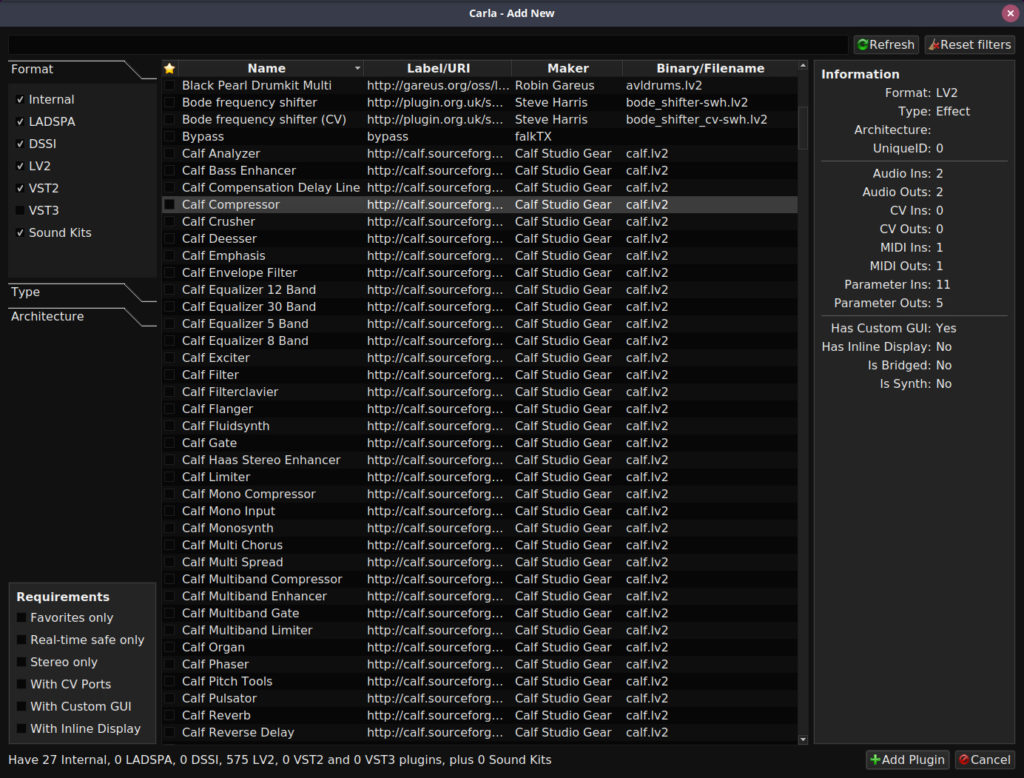
Select the plugins you want to use. Audio Technica 2020USB+ is a condenser microphone. Condenser microphones are great, but tend to pick up a lot of background noise. Lucky for me, I can mitigate that with Calf plugins. Let’s go ahead and add 3 Calf plugins:
- A noise gate. This is very useful to reduce background noise.
- A compressor. Compressor is important as it levels volume automatically, and clips spikes, making you sound much better during audio calls.
- A Deesser. Nice to mitigate those annoying “s” sounds.
Once done adding your plugins, they will show up in Carla Rack.
Now we need to configure Carla Patchbay. Carla Patchbay emulates in software, what you would do with Audio Hardware. Consider each plugin to be an audio device in your studio. You need to connect each one of those with audio cables, right? This is exactly what we need to do with the Carla Patchbay.
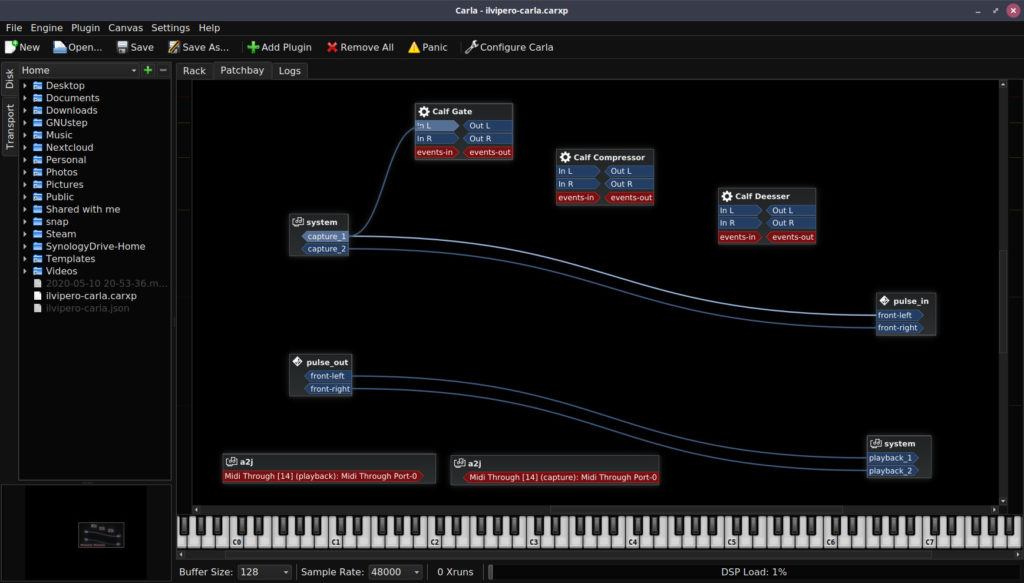
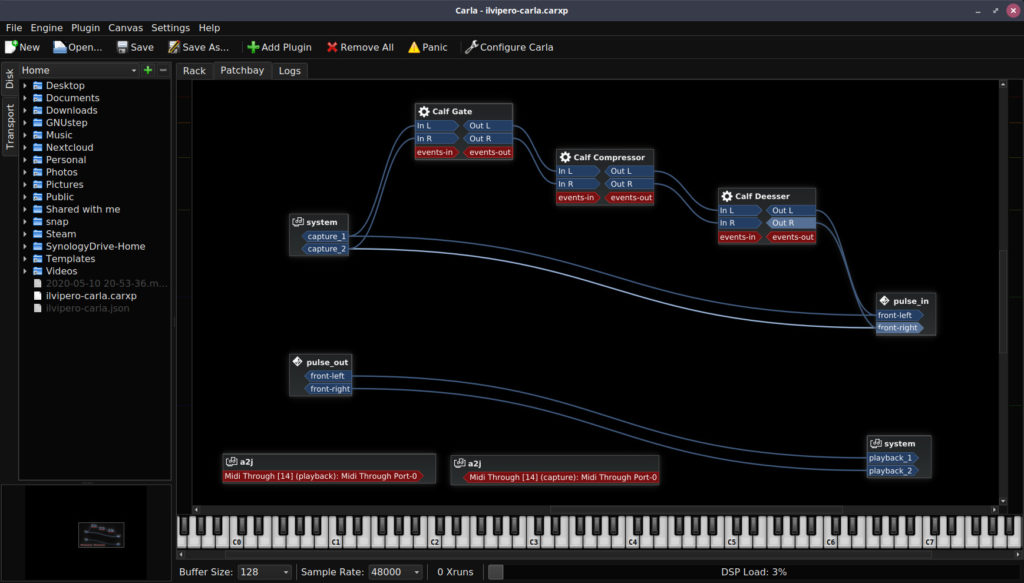
Let’s get started! Click on “Patchbay” and space out all items per below picture. This gives us a cleaner layout to work with.
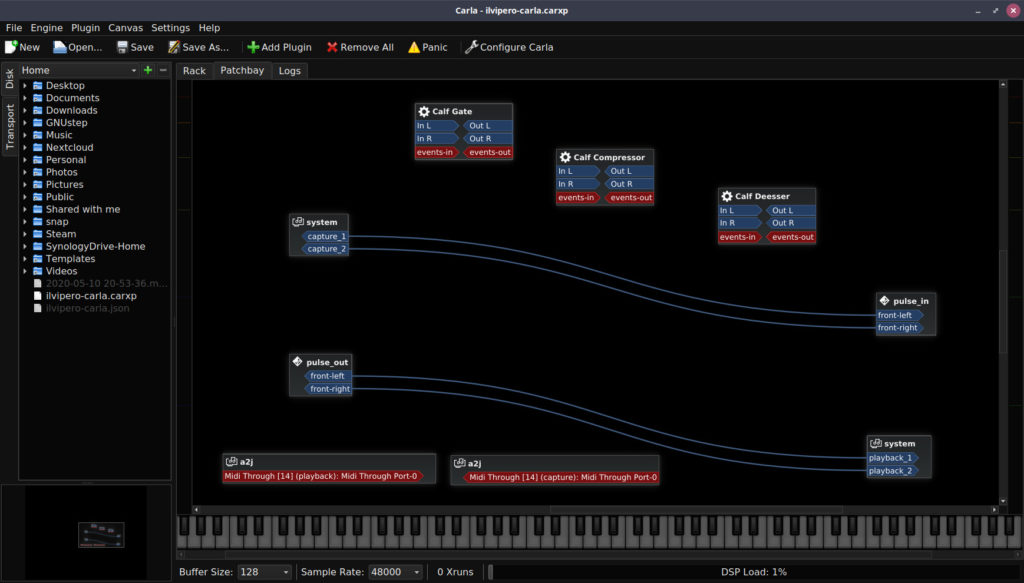
Left Click and drag from “System Capture_1” to “Calf Gate In L”.
Left Click and drag from “System Capture_2” to “Calf Gate IN R”.
Left Click and drag from “Calf Gate Out L” to “Calf Compressor In L”.
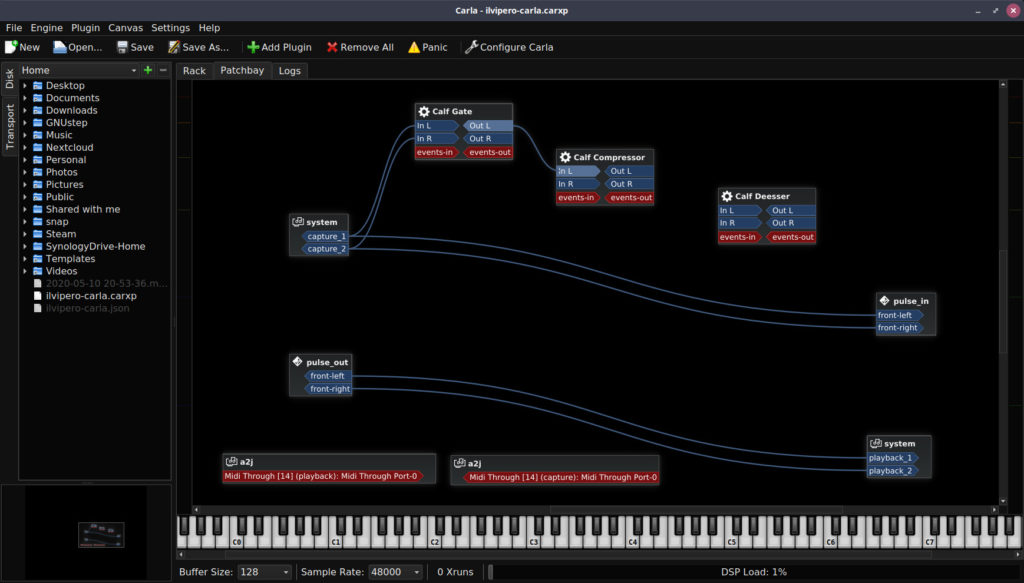
Left Click and drag from “Calf Gate Out R” to “Calf Compressor In R”.
Left Click and drag from “Calf Compressor Out L” to “Calf Deesser In L”.
Left Click and drag from “Calf Compressor Out R” to “Calf Deesser In R”.
Left Click and drag from “Calf Deesser Out L” to “Pulse_In front-left”.
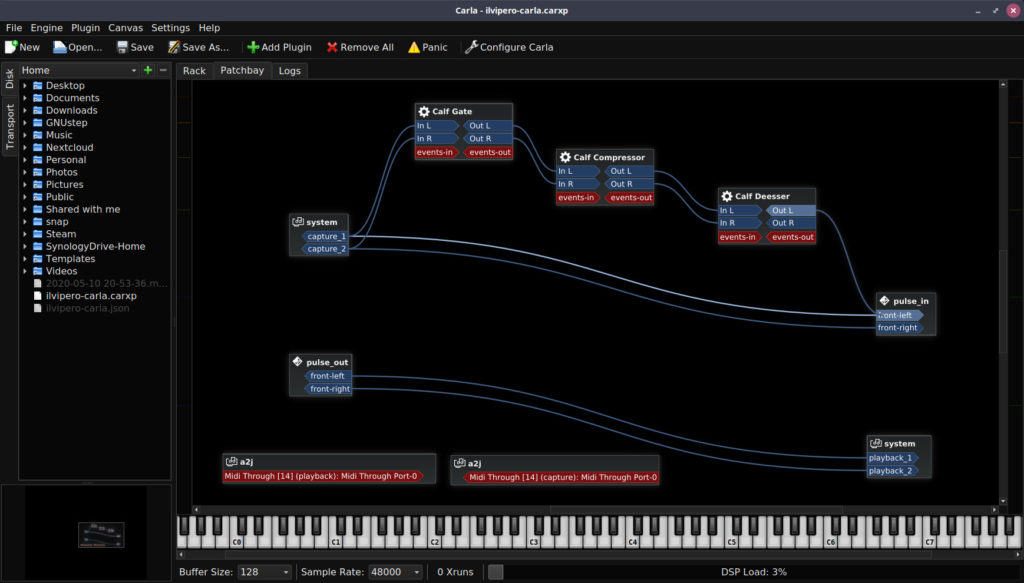
Left Click and drag from “Calf Deesser Out R” to “Pulse_In front-right”.
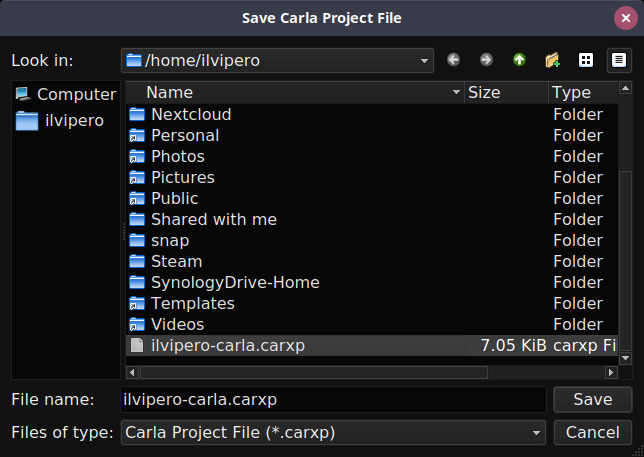
Click “Save As”, select a name for your file, and confirm by clicking “Save”.
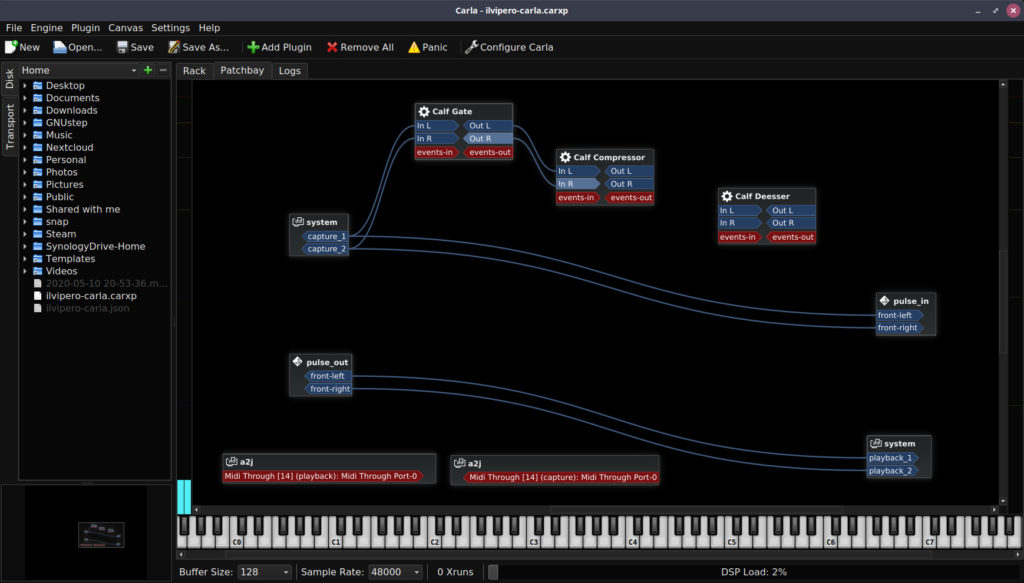
Time for testing! Click on the “GUI” icon on each rack, so that all plugins are open and easier to tweak.
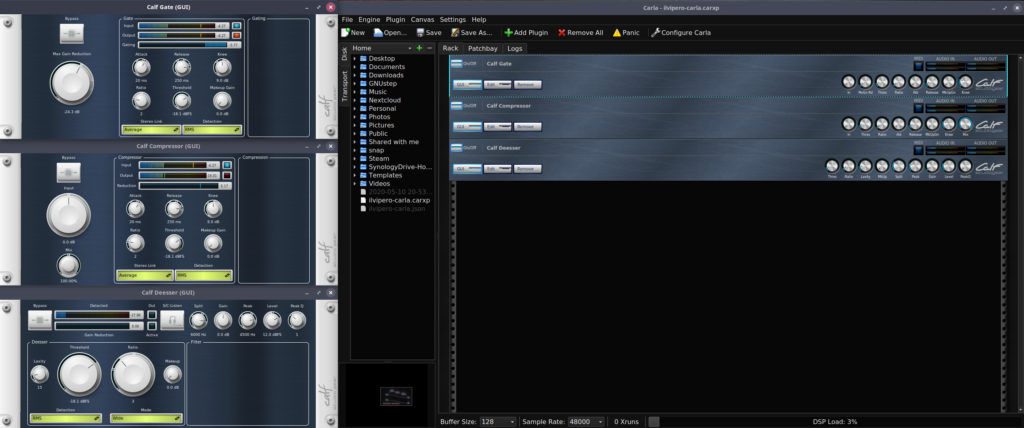
First thing, go ahead and speak in the microphone. Listen if background noises are filtered through the gate, and if other plugins are working as intended. In order to easily check how a plugin is affecting audio, you can click on the “Bypass” Icon for each plugin, therefore disabling it and allowing sound to flow through bypassing it.
The easiest plugin to test, especially with a condenser microphone, is the Calf Gate. Click on Bypass, and background noise should be immediately noticeable in your earphones. If that happens, it means your plugin is working.
Have fun, tweak plugins settings as needed, add a few more if needed. Once you are done, remember to save your project!
Step 5 – Carla project auto start
I use my microphone quite often. I really want to have all the Carla settings and plugins to be ready any time and for any app I might need to use. Because of that, I want Carla to auto start when I login my system. Also, Carla does not have those options in the software, so I ended up using a small software and a script to completely automate it. If you like the idea, you can follow the steps below:
Install software and create the script
- Open “Software” application, search for xdotool, and install the software.
- Open your text editor, and paste the text inside it:
#!/bin/bash
sleep 5s
/usr/bin/carla ~/carla-project.carxp &
sleep 2s
xdotool search --onlyvisible --class carla windowminimize- Save it on your home folder, call it carla-autostart.sh and exit your text editor.
- From Nemo file brower, right click on the file, select properties, and from the permissions tab, tick Allow executing file as program.
Schedule script to run on session login
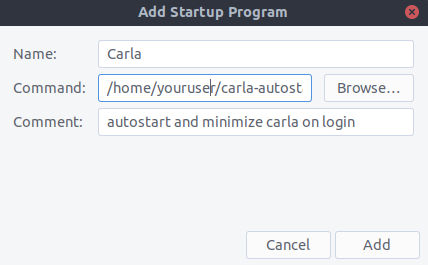
Open your Application Launcher, search for Startup. Open Startup Applications. Then, click on Add .

- Fill the details as follows. Remember to replace “youruser” with your username.
- Name: Carla
- Command: /home/youruser/carla-autostart.sh
- Comment: autostart and minimize carla on login
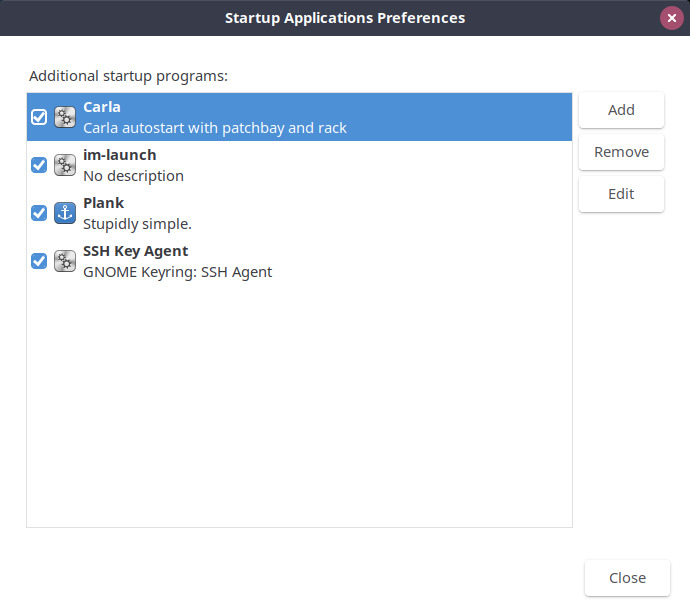
Click on Save, then make sure our new Carla auto start is listed in Additional startup programs:
Change JACK to Pulse input bridge settings
We are almost there. However, there is one last but very important step to take. Studio Controls and Autojack are configured by default to make your basic audio work out of the box. However, we customized the patch bay to route all incoming audio, from system to our filters, and then to Pulse bridge, and we want this to autostart on login, therefore changing default audio bridge settings. If we do not edit Bridge setup, Studio Controls and Autojack will automatically reconnect system to Pulse directly, and that will create a lot of issues with your audio. Lucky for us, changing the default is super easy and can be done from the GUI app Studio Controls.
Open Studio Controls, go to Audio Setup tab, and Pulse Bridging tab. On the left part of the screen, there is an entry called Bridge From Pulse To Jack (input to Jack). In the second drop-down menu, you can see system: capture_1 and 2. Click on that drop-down, and change to no connection.

Test your setup
Reboot system and login. Carla project should automatically open, then minimize itself. The five plus two seconds delay was added on purpose. If you load Carla too quickly, JACK audio server might not be up and running, therefore resulting in error loading your rack and patch bay.
Potential Troubleshooting
Note. Logging in and out of the system might cause some issues with JACK server. Open “Ubuntu Studio Controls” from Plank, check status and start/restart JACK server as needed.
Conclusion
At this point, you should be up and running with a very basic JACK audio server setup. Please note that this is just a starting point. Feel free to experiment, tweak and adapt this tutorial to your needs. If you need help or want to discuss this topic, feel free to reach out in the DLN Discourse Forum. If you have specific support requests you can contact Ubuntu Studio or Ubuntu Budgie teams directly.
Special thanks to Ubuntu Budgie and Ubuntu Studio teams, they are both amazing! If you enjoy their work, please consider getting involved, purchasing some merchandise, or making a donation.
