
With this quick article I want to share my discovery of the amazing Razer hardware, and why I think it is an excellent choice for Linux users.
Before I discuss the main topic of this article, I want to take a step back. I am aware that not everyone is a fan of mechanical keyboards and gaming mice. Switching from a normal keyboard to a mechanical keyboard, and from a regular mouse to a gaming one, is a quality of life improvement that cannot be described with words. My personal opinion is that the relatively low price and great impact in everyday computing is totally worth the cost. But you don’t have to take my word. Instead, I encourage everyone to go out to a store that sells mechanical keyboards and gaming mice, and give them a quick try.
Search for Linux supported gaming Keyboard and Mouse
This journey starts a couple of years back, when I wanted to replace my old and crusty keyboard. I did some research for a good mechanical keyboard, and I did not care much about LEDs and Macros at the time. A quick search landed me on a Corsair MK67 keyboard. The keyboard itself was ok, but nothing to write home. I immediately noticed that there was no official software for Linux to manage the RGB. I found an old and semi-supported project on github. But back then, I did not care much. I managed to set it to all white, and off I went.
That keyboard did not really last long. Key caps were not that good, I had to replace a few fairly quickly, and overall I was not really impressed.
Since I live in Taiwan, I got my hands on a Ducky Shine 6 keyboard. Now, that hardware was really good. Heavy, sturdy, very positive clicking on the switches. Nice LED colors. Sure, once again, the software was only for Windows. Reading the manual, I found out that all Ducky keyboards can be completely programmed without software, directly using the keyboard itself. Easier said that done though, as changing colors, brightness, effects, and saving presets is not a fun experience. Again, I set it to all white, and moved on.
OpenRazer and Polychromatic
As my journey into finding good supported hardware on Linux continued, I stumbled upon OpenRazer and Polychromatic projects. That was a big surprise for me, I wrongly assumed that Razer would be the last brand to have any deal of support on Linux. And partially, I was right. Razer does not officially support Linux in any way.
However, A group of very dedicated volunteers and developers, created this amazing duo of applications called OpenRazer, and Polychromatic. OpenRazer is the backend daemon, and Polychromatic is a frontend for OpenRazer. There are other frontends for OpenRazer but I find Polychromatic to be the best one.
OpenRazer website looks great and is well organized. It is very easy to quickly find an extensive list of supported hardware. And the list is impressive. We can find Keyboards, Mice, Mouse Pads, Laptops, External GPU enclosures, Cup holders, and more.
It is worth to note that if you want to buy a product that is not officially supported, and you are willing to get into the weeds and engage with the community, OpenRazer team is always happy to help out and add more devices to the list of supported hardware.
I decided to go for devices listed on the OpenRazer supported list so I picked up a Razer Huntsman keyboard with opto-mechanical switches, and a couple of Viper Mice, also with opto-mechanical keys.
Hardware is well built, Keyboard is clicky and extremely easy to type on. RGB colors are as bright as I need them to be. This keyboard does not have additional keys to control volume and media, but holding the FN key, turns off all RGBs and only keys with special functions highlight in bright white. What a nice touch, I like that.
Both samples of Viper mice are awesome, ambidextrous, extremely light, and responsive. They have a couple of additional buttons on each side.
Pricing for the whole Razer hardware purchase is on par with other top-tier brands, so no complaints there.
Installation
Installing OpenRazer and Polychromatic is relatively easy. Installation steps are a bit different depending on your distribution of choice. In most cases, installation is completed with a couple of terminal commands. You can check both OpenRazer and Polychromatic links at the end of this article.
If you want a completely automated installation process, you can check Ubuntu Budgie. Our team recently completed a project completely dedicated to gaming. To Install OpenRazer and Polychromatic on Ubuntu Budgie, all you have to do is open Budgie Welcome app, click on Install Software – Gaming. Open the Gaming Tools tab, and click on Polychromatic&OpenRazer. Everything will be done automatically for you, including adding your user to correct group. If you want to learn more, you can check my post on Ubuntu Budgie Blog.
Let’s now have a look at a couple of popular distributions: Fedora and Ubuntu. Please note that Install instructions for Ubuntu also work on Ubuntu Flavours and Derivatives.
Installation on Fedora
In order to install OpenRazer and Polychromatic on Fedora, we need to check both projects websites, and paste a couple of commands on the terminal. I am using latest release of Fedora, currently 35, on this tutorial.
sudo dnf install kernel-devel
sudo dnf config-manager --add-repo https://download.opensuse.org/repositories/hardware:razer/Fedora_35/hardware:razer.repo
sudo dnf install openrazer-meta polychromatic
Before we reboot our system, we need to add our user to the plugdev group
sudo gpasswd -a $USER plugdev
Installation on Ubuntu-based Linux distributions.
According to OpenRazer website, this works well on Ubuntu proper, Ubuntu flavors, and Ubuntu derivatives. It worked well on my Ubuntu Budgie, tested on 20.04, 21.10, and 22.04.
First, we need to add a couple of PPAs. I am going to stick with stable channels. If you want to help testing or need new features, you can hop on the testing PPAs.
sudo add-apt-repository ppa:openrazer/stable
sudo add-apt-repository ppa:polychromatic/stable
sudo apt update
sudo apt install openrazer-meta polychromatic
Before we reboot our system, we need to add our user to plugdev group:
sudo gpasswd -a $USER plugdev
Amazing User Experience with Polychromatic GUI
After reboot, I can see polychromatic icon loaded on my top panel, and it lists both my mouse and my keyboard. Excellent. Clicking on Polychromatic icon, I can quickly apply presets to all Razer devices.But if you think this is it, you are in for a big surprise.
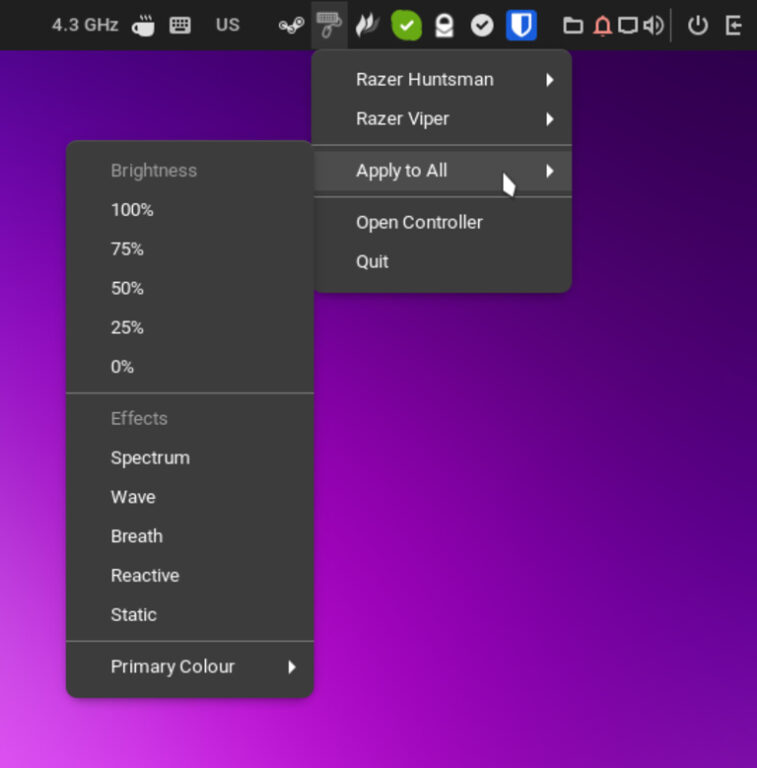
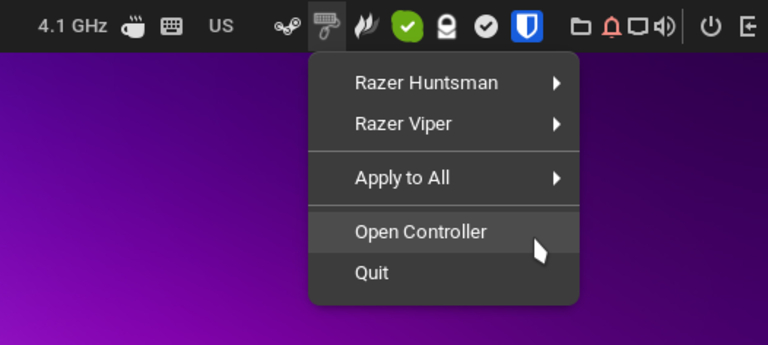
Allow me to open the Polychromatic GUI tool and show you what an amazing user experience is waiting for us. Let’s click on Polychromatic taskbar icon, select “Open Controller”.
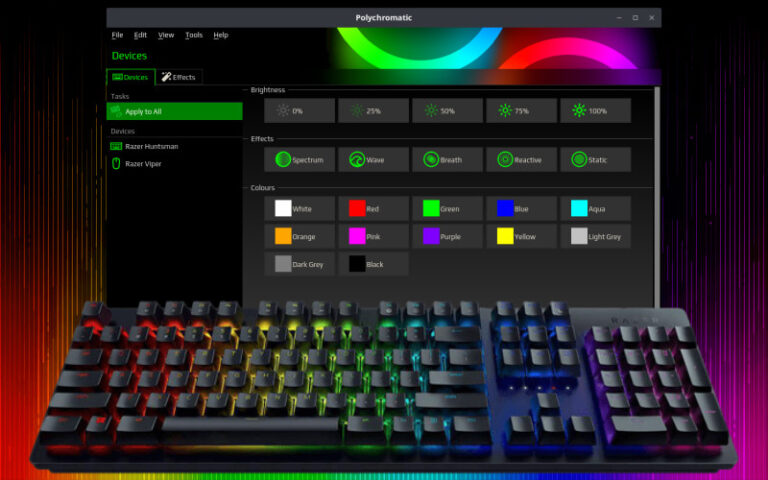
Saying that this is a nice GUI, is an understatement. Polychromatic team has crafted something amazing for us.
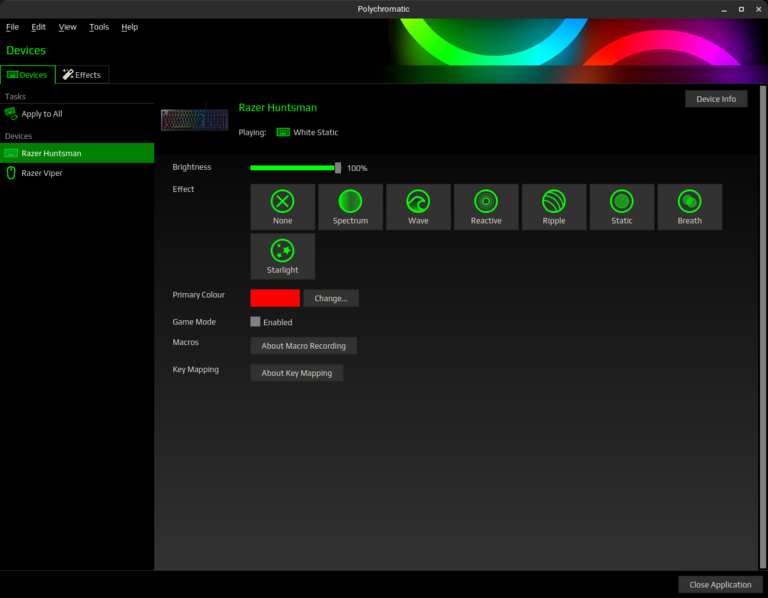
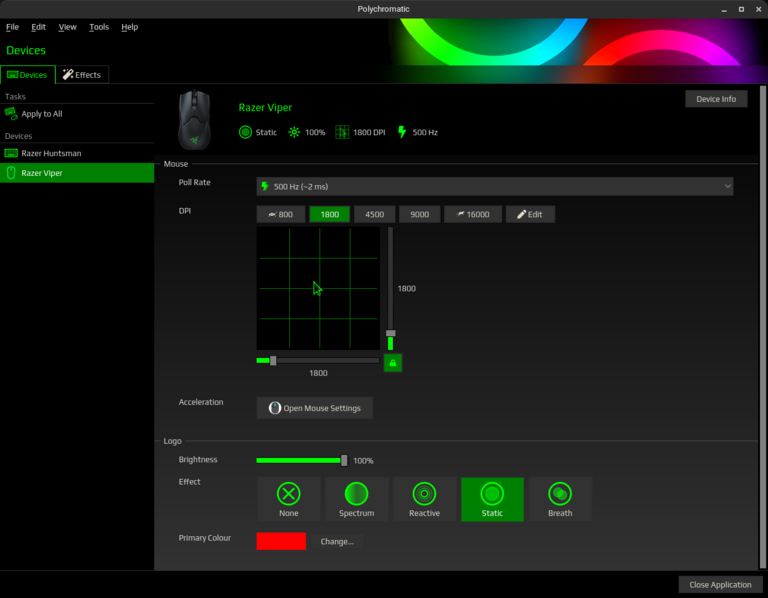
This GUI looks good, works well, and is easy to understand. From here we can see all our Razer devices, select them, tweak settings such as mouse DPI, poll rate,acceleration, LED colors.
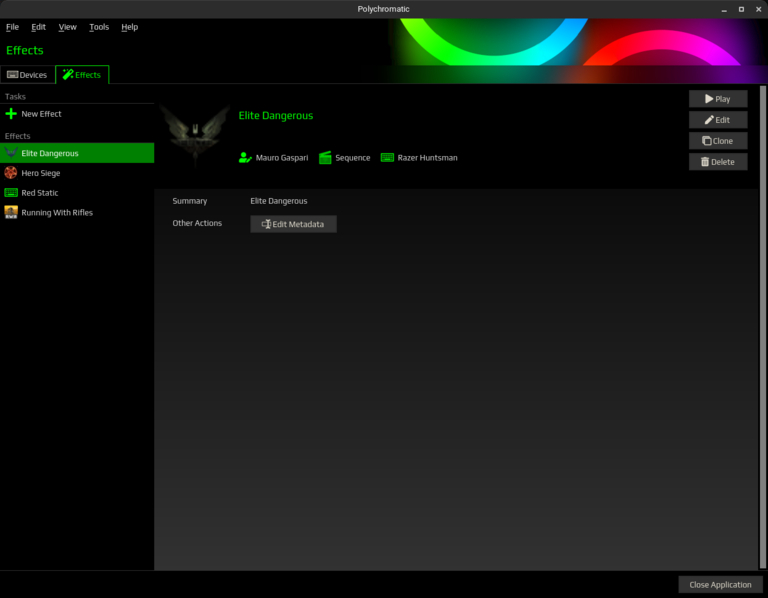
The real treat though, is in the Effects tab. Moving over we can see That I already created a few effects for a few of the games I play. This might sound trivial but I find it very fun and useful. Switching from a game to another, it can take a while to adjust to keyboard controls or shortcuts. Having important keys highlighted in different colors makes it super easy to hop back.
In my gaming profiles I like to keep non critical keys to a grey color, so that the keys I really need show up even more. You can see below here a few of the profiles I created. There is much more that can be done, such as animations and special effects. For me however, static and easy to see colors, are more than enough.
Creating a new Effect with Polychromatic
Let’s go ahead and create a new effect. I am going to pick a game I like quite a bit: Starbound. Starbound is a family friendly, fun game that mixes a bit of a side scrolling action, building, and space exploration. It is quite simple but it does have a few keyboard shortcuts.
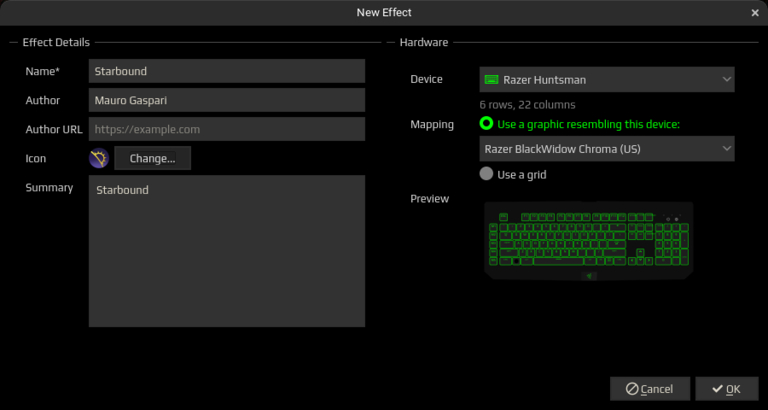
In order to start, we need to move to Effects Tab on main control panel of Polychromatic. We then pick a name, in this case “Starbound”. Author and description are not mandatory, but why not add them? It is going to be useful if we start sharing our profiles with friends.

Next, we pick an icon. This is made super easy as we can click Browse, and select from a few tabs, including OpenRazer generic icons, applications installed on our system, and even Steam. I am going to choose applications installed on my system, and then select Starbound icon.

On the right side, we need to select correct options:
- Device: I am going to select my Huntsman keyboard
- Mapping: This can be an important step. UK and US based keyboard profiles have a couple of different keys. Make sure to select “Use graphics resembling this device”, and pick correct one for your region from dropdown menu. In my case, US. It is easy to spot the difference in the size of the “Enter” key.
Once we are done with our choices, we can save our effect, by clicking “OK” at the bottom right of the window. This opens up effect customization tool. This is a very nice and capable editor, where we can really create customized, animated light shows with our keyboards. In this case, I am only looking at something very basic.
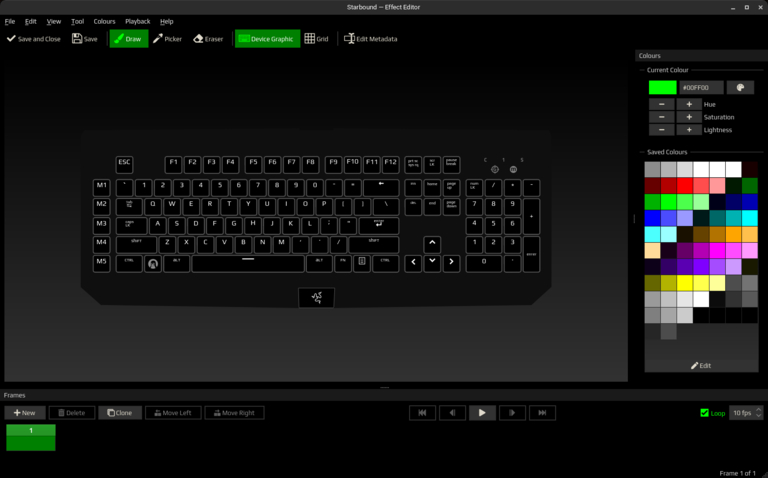
First, I am going to paint all keys with a dark grey, so that they don’t stand out too much but are still visible in low light. Once I am done, I am going to pick some colors that make sense for me. That is super easy. Once I am done, all I need to do is hit “Save and Close”. And that’s it. Super easy. If I want to play around and make sure my effects work fine, I can click on “Play” next to each effect and see if my keyboard behaves as it should.

Tips and Tricks
There are a couple of tricks I would like to share with you.
Exporting and Importing effects
Creating effects is very easy but if you like to have quite a few of those, it is not fun to lose them when distro hopping, or reinstalling. Saving effects is super easy, all we have to do is copy the folder ~/.config/polychromatic/effects in your backup location. Files are very small and easy to restore when needed.
LED behavior on screensaver and OpenRazer options
By default OpenRazer will turn off your keyboard LEDs when screensaver kicks in or when your monitor goes to sleep. This is very easy to change. All options are saved in this file:
~/.config/openrazer/razer.confIn our case, all we need to do is replace the line below from:
# Turn off the devices when the systems screensaver kicks in
devices_off_on_screensaver = True
to:
# Turn off the devices when the systems screensaver kicks in
devices_off_on_screensaver = False
Conclusion
This was a quick article about two exciting projects that in my opinion, are unrivaled when it comes to gaming peripherals. Open Source, no forced cloud, great support and a lot of very nice features.
If you liked this article, you can check my other work on Front Page Linux.
Last but not least, please remember that open source projects are made by passionate people and volunteers, and they most likely need help. And yes, you can help even if you are not a developer. If you are asking yourself how you can help, check a few things that you can do and remember even a little kindness goes a long way:
- Let the project team know how much you love their work
- Reach out and ask if the project needs any help
- Spread some love, become and advocate
- Buy some merchandise, join as patron, or make a donation
