This tutorial is a follow up on my previous article Ubuntu Studio 20.10: Is It The Perfect Linux Distro? In the first article, we looked at all the major changes in Ubuntu Studio. There was a lot to cover already and I quickly realized there was no way I could also squeeze a JACK tutorial in there.
This tutorial will take you through the audio stack in Ubuntu Studio, and show you how easy it is to get a perfectly working JACK setup, including PulseAudio bridge, using Studio Controls, Carla, LSP plugins. On top of that, I wrote a small script to automatically start and minimize Carla rack, patchbay, and microphone plugins. In my opinion this helps a lot, especially if you are using Ubuntu Studio as your daily driver, not on a dedicated Audio/Video production machine.
Target Audience
I made this tutorial for all Linux users. I will take you step by step into the configuration, which is done completely from GUI tools. No command line magic is needed. Before we start, let’s have a look at PROs and CONs of using Ubuntu Studio with JACK audio.
PROs
- Easy to install and manage Jack audio server.
- Low latency audio.
- Low latency kernel, CPU governor, and other tweaks.
- Carla patch bay, rack, easy plugins and effects management.
CONs
- Not as easy as PulseEffects.
- Only available on Ubuntu and its flavors/derivatives.
Studio Controls configuration
It’s time to go ahead and setup JACK. Thanks to the great work of Ubuntu Studio team, setting it up is completely done from GUI tools, fairly quickly. Once setup, if no changes are needed, JACK and Studio Controls will take care of everything automatically.
I really want to stress this point out. Setting up JACK, involves knowing a bit of everything in the GNU/Linux audio stack: Alsa, PulseAudio bridges, JACK, system services, JACK software to install, JACK1 or JACK2? Then, most likely some basic bash or python scripting.
In here, nothing of that is required, You are presented with a couple of GUI tools and everything auto-magically works.
Step 1: Studio Controls
Open application menu, search for “Studio” and open Studio Controls. Quick side note here, new Studio Controls icon is pretty slick!
I want Studio Controls easily reachable so I have it in my favorites and pinned on my latte dock. This is not mandatory to do but quite handy.
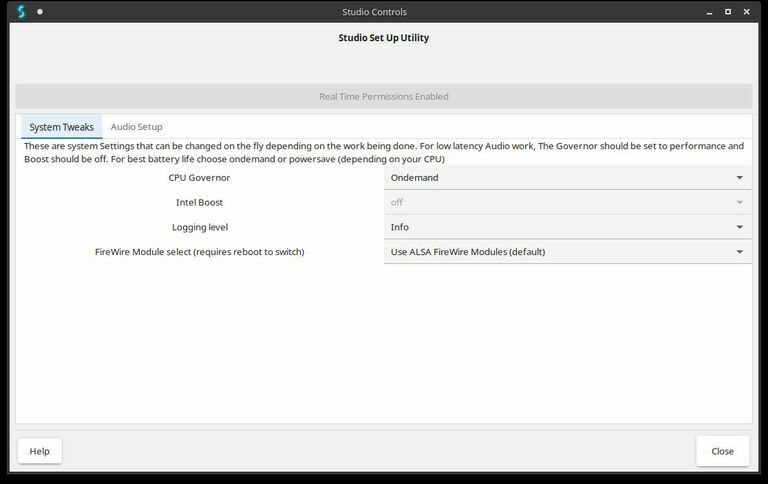
Studio Controls – System Tweaks
In the System Tweaks Tab of Studio Controls, you can select the CPU Governor, and for best results the Performance governor is recommended. However I prefer to control it via indicator-cpufreq on my main panel. I have not noticed any issue with JACK audio on either my desktops and laptops. You can leave rest of settings as default.
NOTE: Make sure that you see Real Time Permissions Enabled . If for some reason those are not enabled, Studio Control will prompt you to click, so it can be fixed.
Studio Controls – Audio Setup
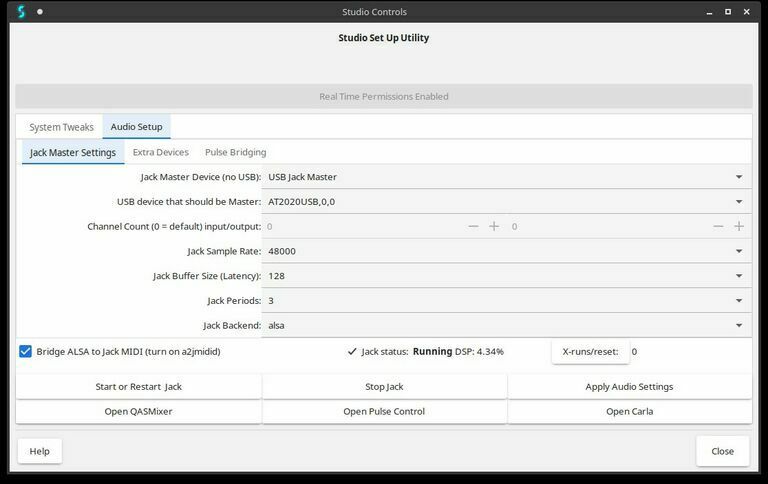
In the “Audio Setup” tab, check the following:
- Select your “Jack Master Device (no USB). If you need to use an USB interface, select “USB Jack Master”, or directly select the USB interface in the menu “USB device that should be Master”.
- Jack Sample Rate: This is hardware specific. Check your interface manual. 48000 or 44100 are typical settings that work with many devices.
- Jack Buffer Size (Latency): This is hardware specific. Check your interface manual. Start with 128.
- Jack Periods: Also hardware specific. 3 is a good setting for USB interfaces.
- Jack Backend: alsa
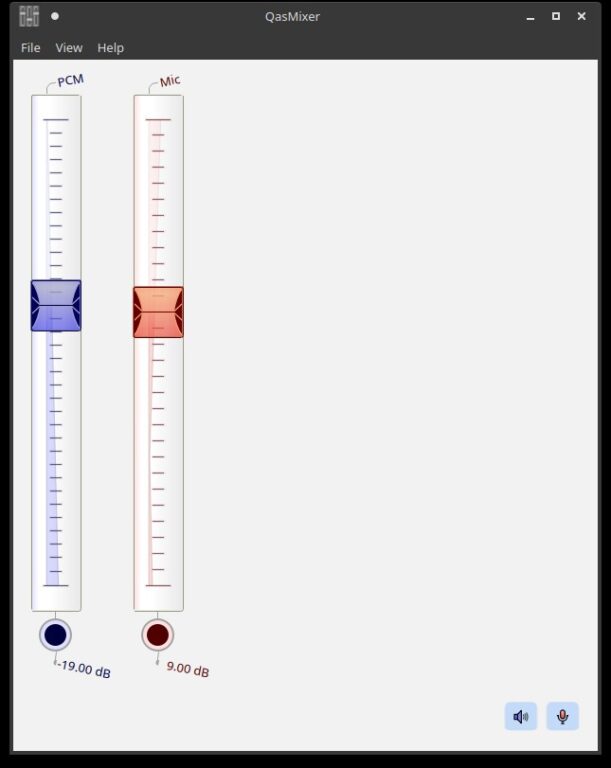
- Click on “Open QASMixer”.
- In the QASMixer settings, make sure both input and output devices are visible, enabled, and their volumes are at acceptable levels.
- Close QASMixer when done
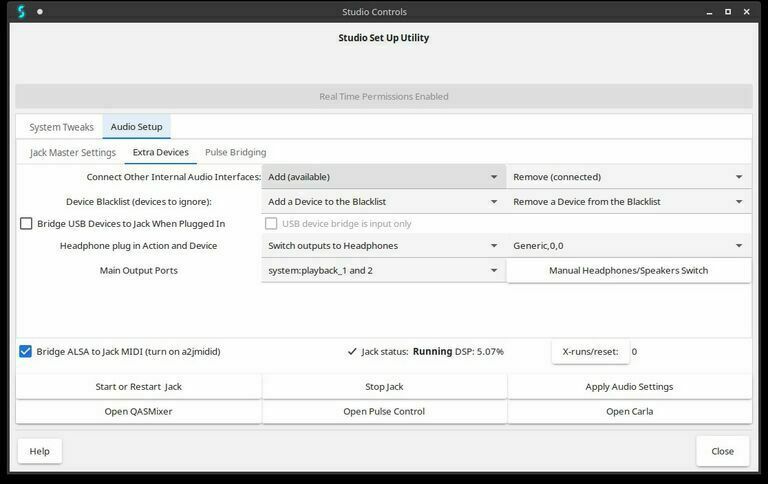
At this point, basic setup is completed. Connect your headset to your output audio interface (In my case, using an Audio Technica 2020USB+ Microphone). Click on “Start or Restart Jack”. Make sure X-runs/reset numbers are zero. If you see the number increase, it is better to tweak Jack Master Settings.
In the picture below, you can see Jack status is green, running, with low DSP, X-Runs/reset are at zero. All looks good to go.
Audio Testing
Next up, let’s test our audio. Go ahead and open Open OBS Studio.
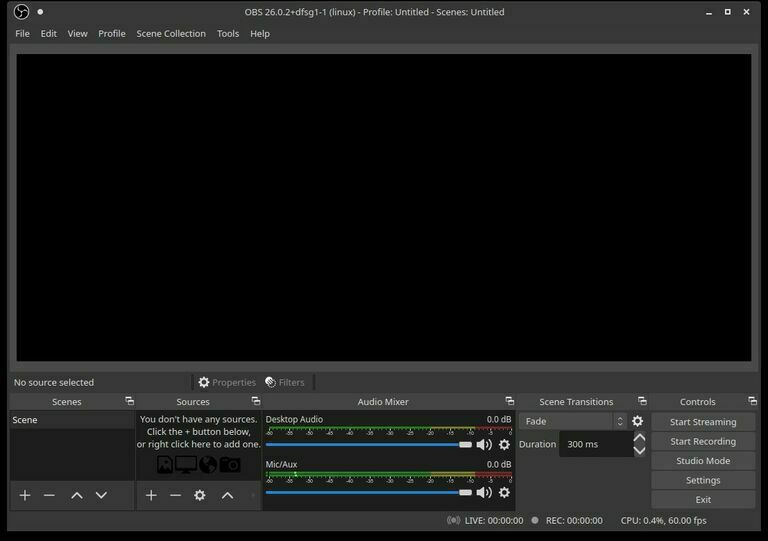
In OBS Studio, configure microphone in monitoring mode. This means you can hear your own voice in your headset. It is very important to do this to test settings.
In the Audio Mixer panel, Select the gear icon on Desktop Audio and select properties. Select Jack sink (pulse_out), and confirm by clicking OK.
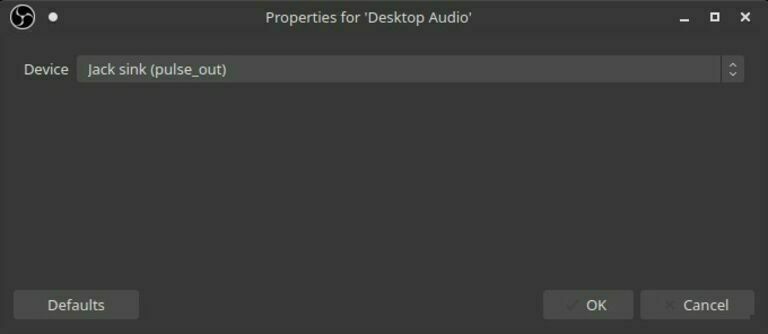
Select the gear icon on Mic/Aux and select properties. Select Jack source (pulse_in), and click OK.
Select the gear icon on Mic/Aux and select Advanced Audio Properties. In the Mic/Aux Audio Monitoring, select Monitor Only, and click Close.
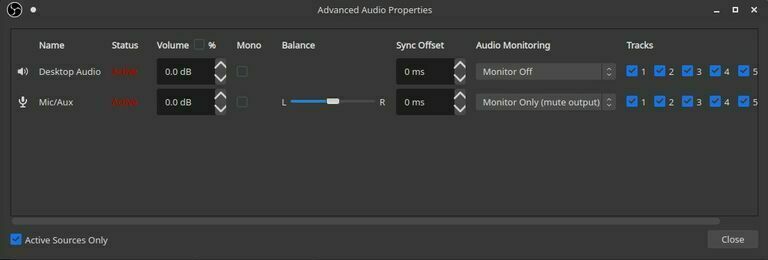
That’s it. Your OBS is now monitoring your microphone. Speak in the microphone. Being JACK a low latency audio server, there should be no delay between your voice and the sound coming from your headset.
My Audio Technica 2020USB+ sound output has a slider I can move to balance direct monitoring (at the hardware level) or audio coming from the system. Sliding back and forth, optimal setting should have no difference in delay. This concludes JACK basic setup via Studio Controls.
Step 2: Carla Patchbay and Rack
Carla Rack
You will need to make sure your OBS Studio is open and in microphone monitoring mode, if you’re not quite sure how to get in that mode then see the instructions above. Open Studio Controls, and click Open Carla. If you are using Latte Dock, Right click on the Carla Icon on the Latte dock, and select Pin Launcher. Once that is done, let’s move ahead and click on “Add Plugin”.
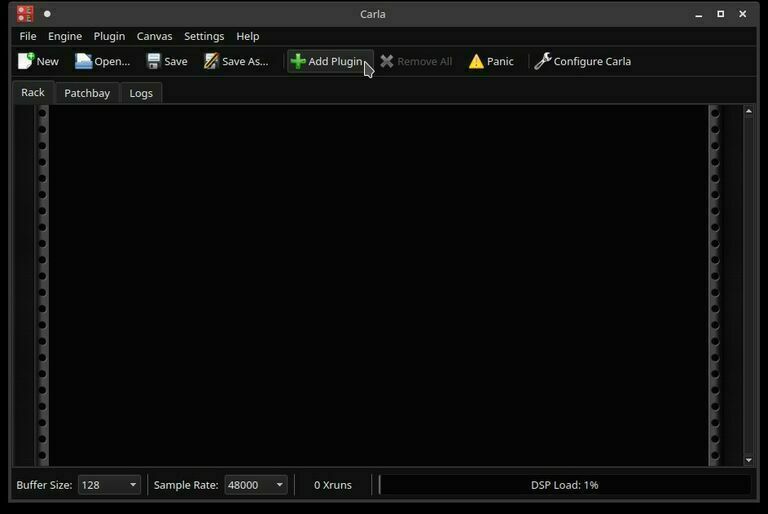
Select the plugins you want to use. Audio Technica 2020USB+ is a condenser microphone. Condenser microphones are great, but tend to pick up a lot of background noise. Lucky for me, I can mitigate that with LSP plugins. Let’s go ahead and add 3 LSP plugins:
- A noise gate. This is very useful to reduce background noise.
- A compressor. Compressor is important as it levels volume automatically, and clips spikes, making you sound much better during audio calls.
- A loudness compensator. This helps equalizing loudness around the sound.
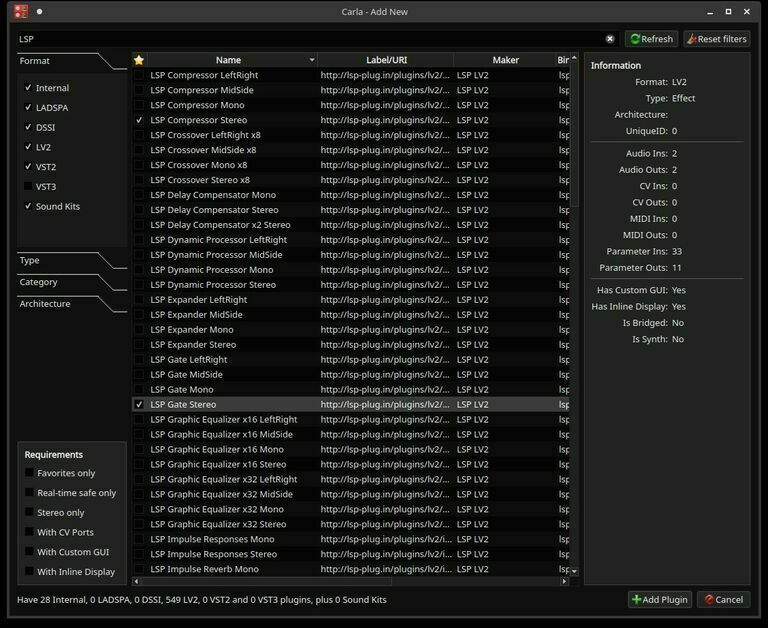
NOTE: If you want to know more about your options with plugins, this is a nice place to start: LSP Plug-in Manuals.
Once done adding your plugins, they will show up in Carla Rack. As you can see, Since 20.10, I have switched from Calf Plugins to LSP plugins. LSP plugins are now default and recommended.
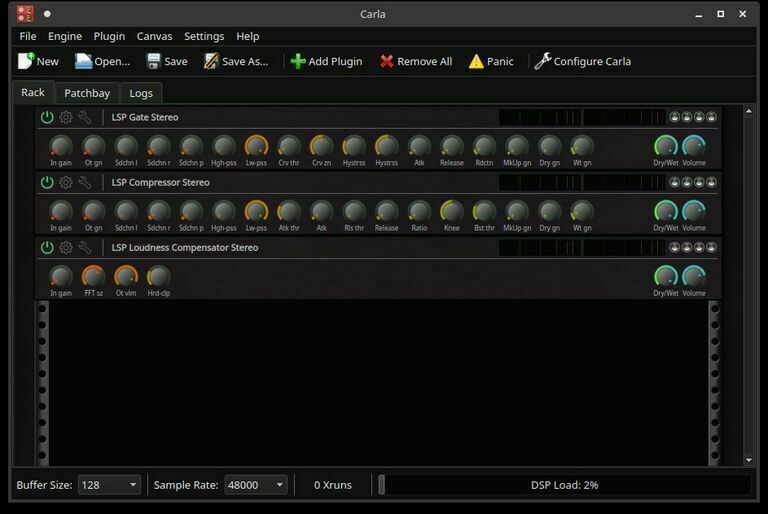
Carla Patchbay
Now we need to configure Carla Patchbay. Carla Patchbay emulates in software, what you would do with Audio Hardware. Consider each plugin to be an audio device in your studio. You need to connect each one of those with audio cables, right? This is exactly what we need to do with the Carla Patchbay.
Let’s get started! Click on “Patchbay” and space out all items per below picture. This gives us a cleaner layout to work with.
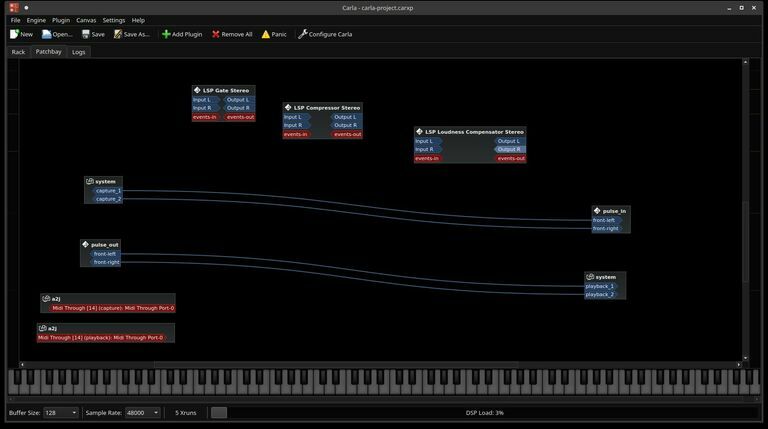
Left Click and drag from System Capture_1 to LSP Gate Stereo In L.
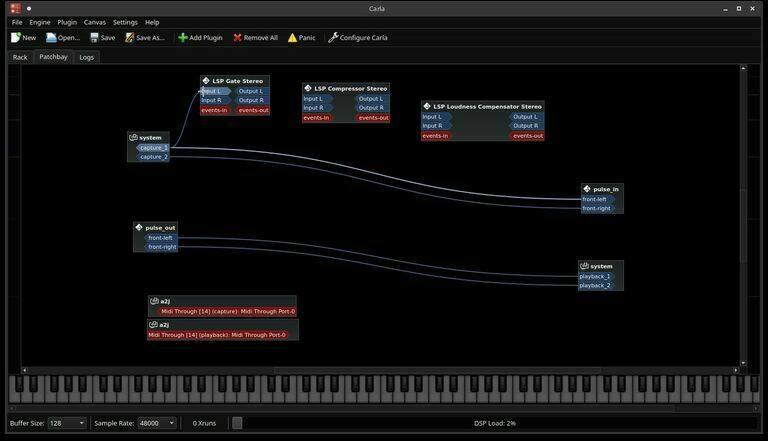
Left Click and drag from System Capture_2 to LSP Gate Stereo In R.
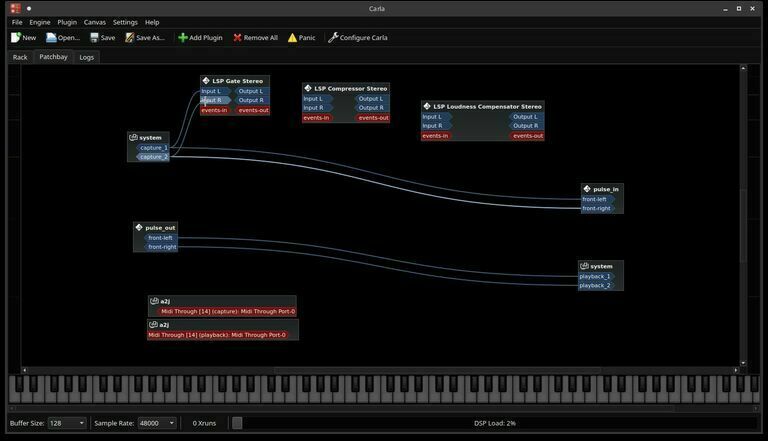
Left Click and drag from LSP Gate Stereo Out L to LSP Compressor Stereo In L.
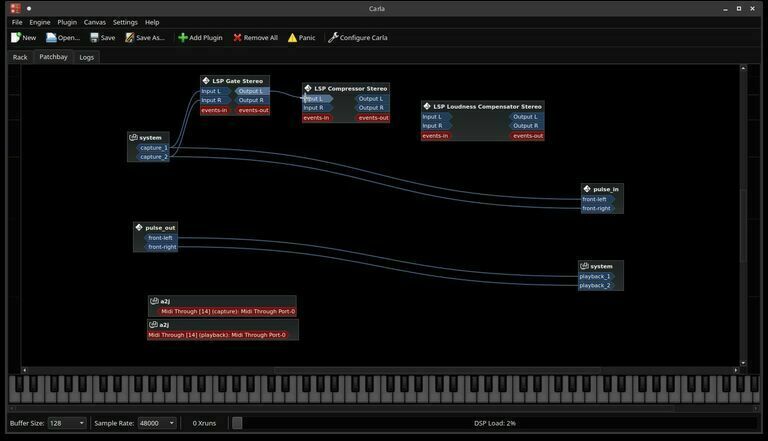
Left Click and drag from LSP Gate Stereo Out R to LSP Compressor Stereo In R.
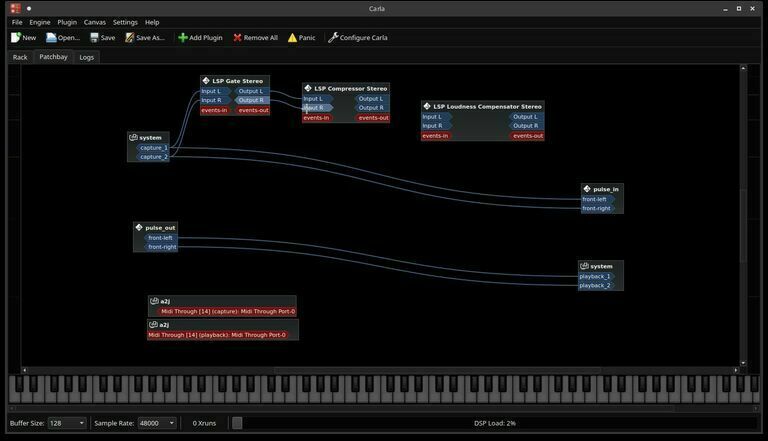
Left Click and drag from LSP Compressor Stereo Out L to LSP Loudness Compensator Stereo In L.
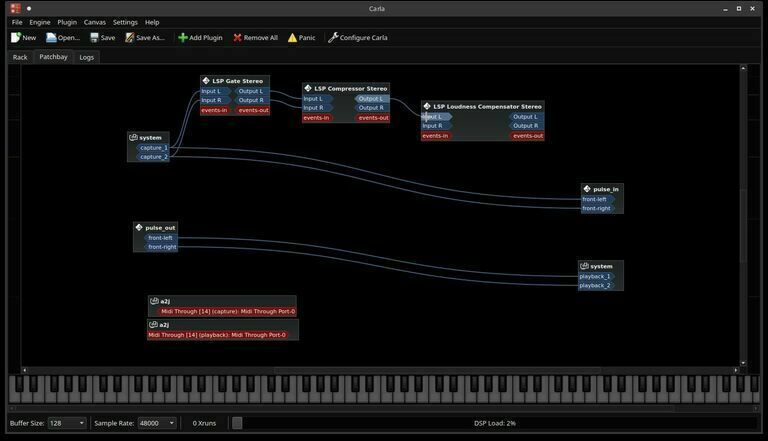
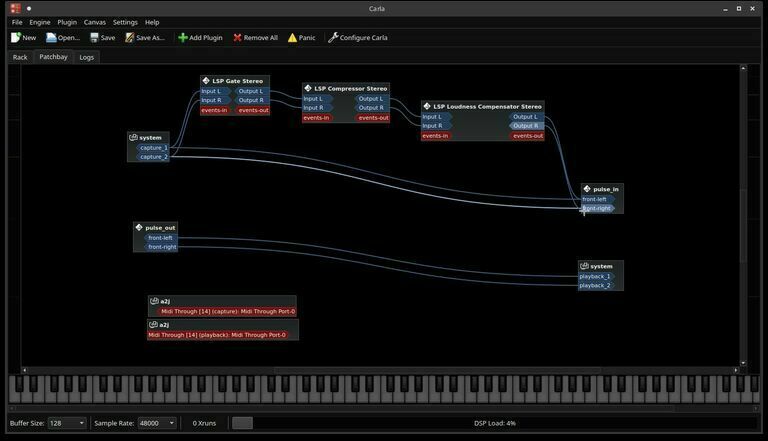
Left Click and drag from LSP Compressor Stereo Out R to LSP Loudness Compensator Stereo In R.
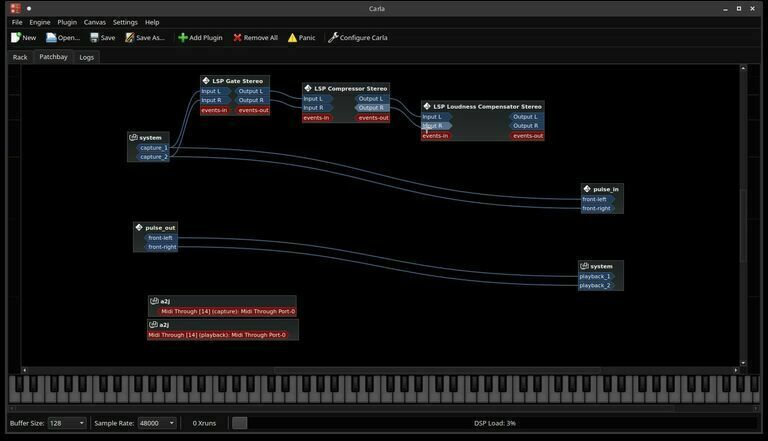
Left Click and drag from LSP Loudness Compensator Stereo Out L to Pulse_In front-left.
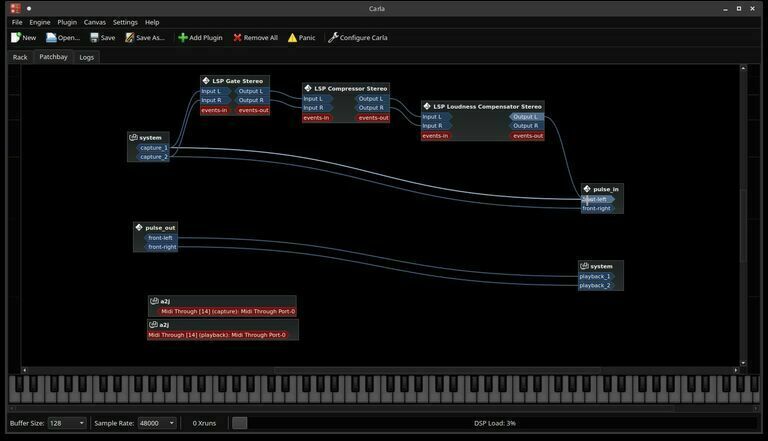
Left Click and drag from LSP Loudness Compensator Stereo Out R to Pulse_In front-right.
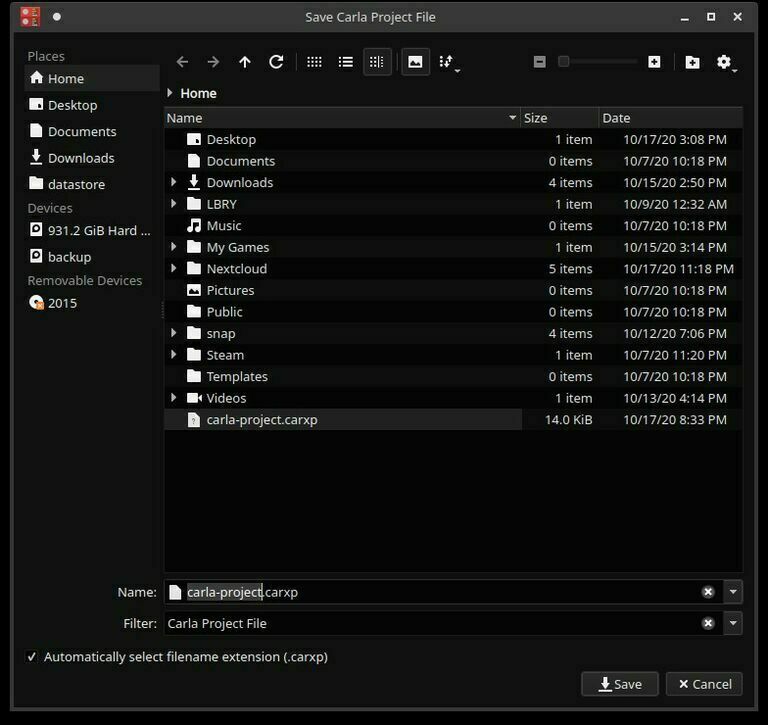
Click Save As, select a name for your file, and confirm by clicking Save.
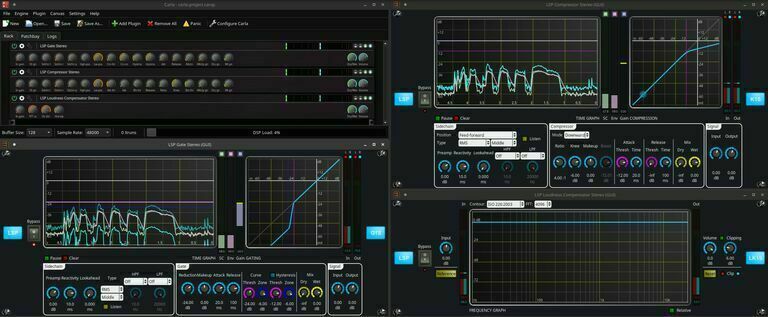
Time for testing! Click on the gear icon on each rack, so that all plugins are open and easier to tweak.
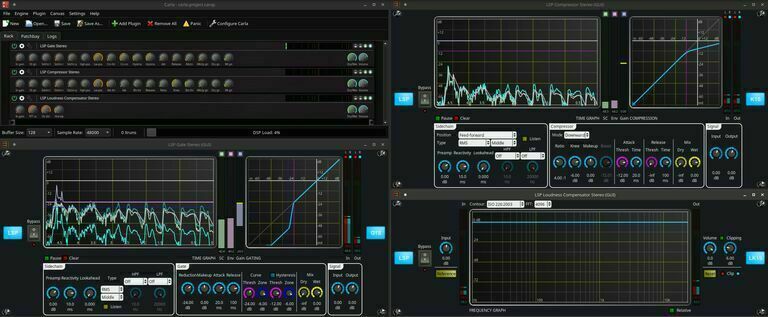
First thing, go ahead and speak in the microphone. Listen if background noises are filtered through the gate, and if other plugins are working as intended. In order to easily check how a plugin is affecting audio, you can click on the Bypass Icon for each plugin, therefore disabling it and allowing sound to flow through bypassing it.
The easiest plugin to test, especially with a condenser microphone, is the LSP Gate. Click on Bypass, and background noise should be immediately noticeable in your earphones. If that happens, it means your plugin is working.
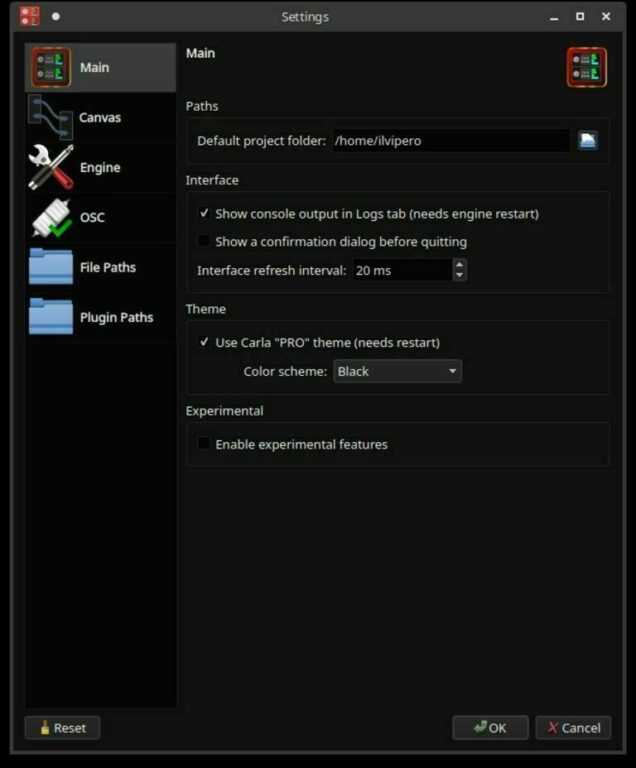
One last thing, open Carla settings, by clicking Configure Carla icon on main interface. Make sure there is no tick on the option Show a confirmation dialog before quitting. This will avoid issues while logging off, rebooting, or shutting down.
Have fun, tweak plugins settings as needed, add a few more if needed. Once you are done, remember to save your project!
Step 3: Carla project auto start
I use my microphone quite often. I really want to have all the Carla settings and plugins to be ready any time and for any app I might need to use. Because of that, I want Carla to auto start when I login my system. Also, Carla does not have those options in the software, so I ended up using a small software and a script to completely automate it. If you like the idea, you can follow the steps below:
Install software and create the script
- Open Discover or Muon, search for xdotool, and install the software.
- Open your text editor, and paste the text inside it:
#!/bin/bash
sleep 5s
/usr/bin/carla ~/carla-project.carxp &
sleep 2s
xdotool search --onlyvisible --class carla windowminimize- Save it on your home folder, call it carla-autostart.sh and exit your text editor.
- From Dolphin file brower, right click on the file, select properties, and from the permissions tab, tick is executable.
Schedule script to run on session login
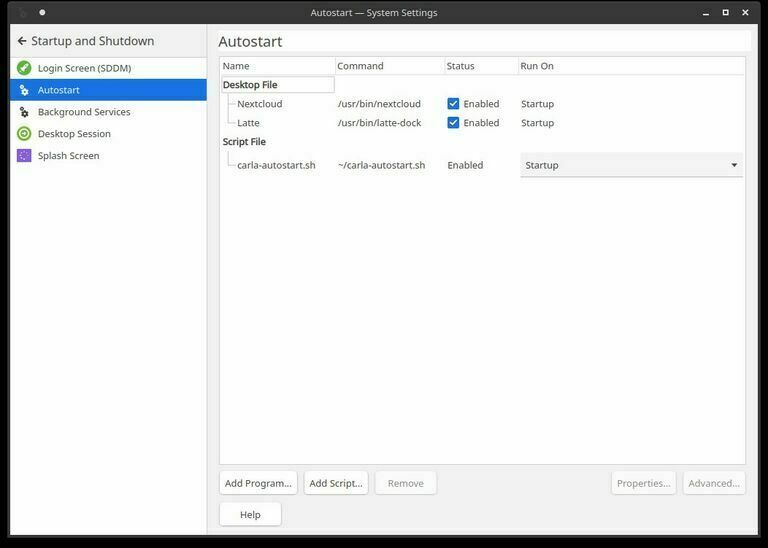
- Open your Application Launcher, search for Autostart. Open Autostart menu. Thenk, click on Add Script…
- Select the location of the script: ~/carla-autostart.sh
- Leave other options and select OK.
- Make sure that Status is Enabled, and Run On is on Startup.
Change JACK to Pulse input bridge settings
We are almost there. However, there is one last but very important step to take. Studio Controls and Autojack are configured by default to make your basic audio work out of the box. However, we customized the patch bay to route all incoming audio, from system to our filters, and then to Pulse bridge, and we want this to auto start on login, therefore changing default audio bridge settings. If we do not edit Bridge setup, Studio Controls and Autojack will automatically reconnect system to Pulse directly, and that will create a lot of issues with your audio. Lucky for us, changing the default is super easy and can be done from the GUI app Studio Controls.
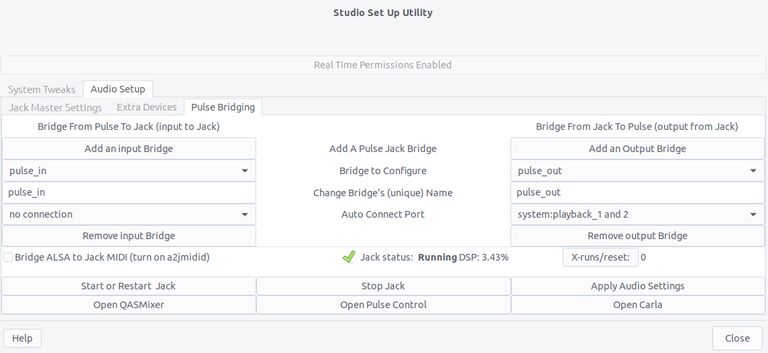
Open Studio Controls, go to Audio Setup tab, and Pulse Bridging tab. On the left part of the screen, there is an entry called Bridge From Pulse To Jack (input to Jack). In the second drop-down menu, you can see system: capture_1 and 2. Click on that drop-down, and change to no connection.
Test your setup
Reboot system and login. Carla project should automatically open, then minimize itself. The five plus two seconds delay was added on purpose. If you load Carla too quickly, JACK audio server might not be up and running, therefore resulting in error loading your rack and patch bay.
Potential Troubleshooting
Note. Logging in and out of the system might cause some issues with JACK server. Open Studio Controls, check status and start/restart JACK server as needed.
Conclusion
At this point, you should be up and running with a very basic JACK audio server setup. Please note that this is just a starting point. Feel free to experiment, tweak and adapt this tutorial to your needs. If you need help or want to discuss this topic, feel free to reach out in the DLN Discourse Forum. If you have specific support requests you can contact Ubuntu Studio team directly, through their support channels.
References and Special Thanks
Special Thanks to Erich Eickmeyer, Len Ovens, and Ubuntu Studio team for bringing us an amazing distribution. Excellent Plasma defaults, content creator suite of applications, and JACK audio server, all together to make this amazing Ubuntu Studio Groovy Gorilla. If you enjoy this amazing distribution, please consider getting involved, purchasing some merchandise, or making a donation via Paypal or Patreon.





Excellent info. One can get in the tall weeds with this stuff rather quickly. You have done an excellent job in making a clear presentation. This helped me.
What about those of us on Ubuntu Studio 20.04 LTS. I cannot find the link, but it was mentioned that upgrading would be too difficult because of the move from Xfce (20.04) to Plasma. Is this still true?
I ask because the intention of running Studio release is to not have to make major changes… as far as I’ve understood it.
Yes. The current
pseudo-official wisdom is to first install xubuntu and then use the Ubuntu Studio Installer.That is a reply I got on the DLN matrix during the beta from Erich Eickmeyer (the Ubuntu Studio lead)
Thank you for this info. I will be upgrading US to 22.04 in a couple of months – but don’t want to leave XFCE.
So, what would be the best course of action for those of us on Xfce-based Ubuntu Studio? I have not seen any documentation for best method to nuke and pave over to the current LTS.
Join the discussion at forum.tuxdigital.com
13 more replies